Foreword
This article will guide you through building a stable, high-speed, and anti-blocking node using the VMess protocol, compatible with a wide variety of clients. As long as you follow the steps provided, success is guaranteed. To simplify the process, we will use the 1Panel management dashboard to handle SSL certificate applications and Nginx configurations.
To get started, you will need:
A VPS (Cloud Server): At least 1GB of RAM is recommended. Hong Kong or Singapore locations are ideal; however, US or European regions are also viable if the network routing is high quality (e.g., VMRack’s Premium Triple-Network routing).
A Domain Name: For full consistency with this tutorial, you can change your domain’s Nameservers to Cloudflare, though this is optional.
Basic Linux Knowledge: You should know how to connect to a server via SSH (using user-friendly tools like FinalShell).
Note: The server used in this tutorial is from VMRack, featuring premium triple-network routing. It is favored for its excellent latency and its ability to smoothly unlock over 90% of global streaming media content.
Installing the 3x-ui Control Panel
Xray-core is a super-set of v2ray-core, supporting the most popular protocols for building proxy nodes, including SS, VMess, VLESS, and Trojan.
x-ui is a web-based dashboard for Xray-core that allows you to manage nodes without manually editing complex JSON configuration files. Since the original x-ui project has not been updated for a long time, we will use 3x-ui, an enhanced version developed by an Iranian developer.
Project Repository: MHSanaei/3x-ui
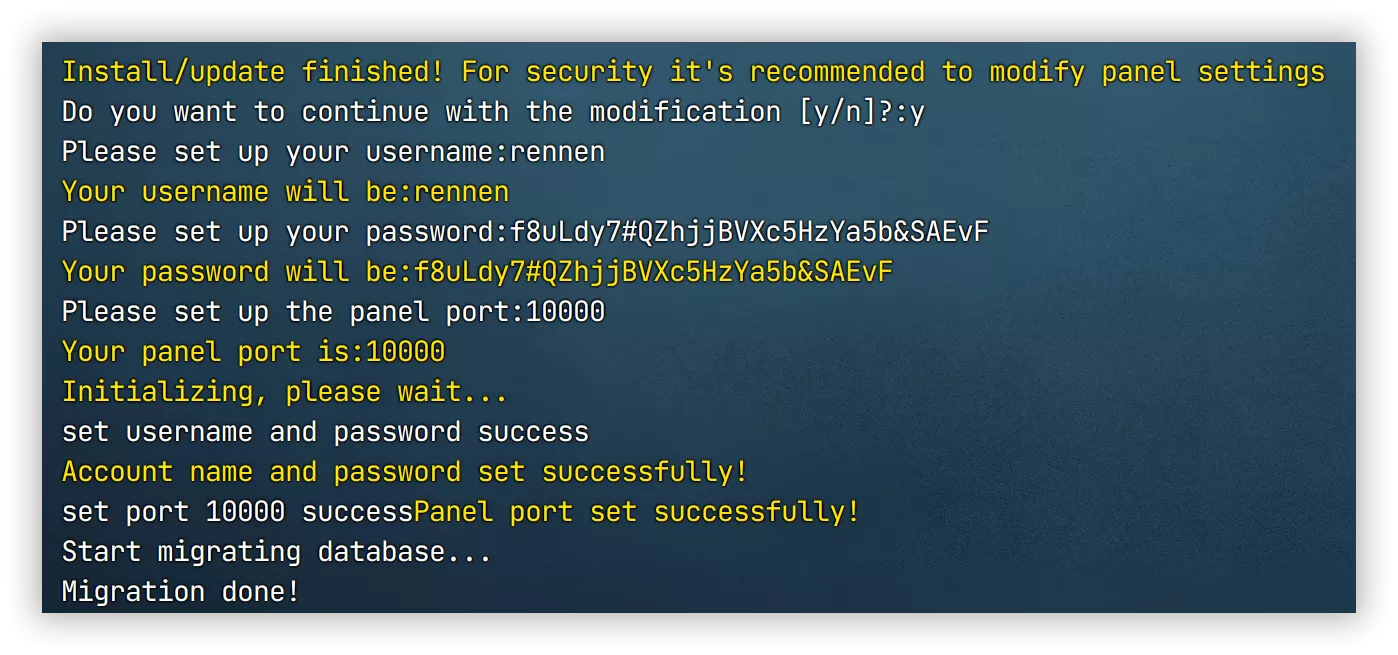
Run the following one-click script to install:
bash <(curl -Ls https://raw.githubusercontent.com/mhsanaei/3x-ui/master/install.sh)
During installation, enter 'y' and press Enter, then choose to manually configure the panel login information. It's best to set a complex username and password, avoiding commonly used passwords. It's recommended to set the panel port number to 10000, as this will be used later.
Building a Node with 3x-ui
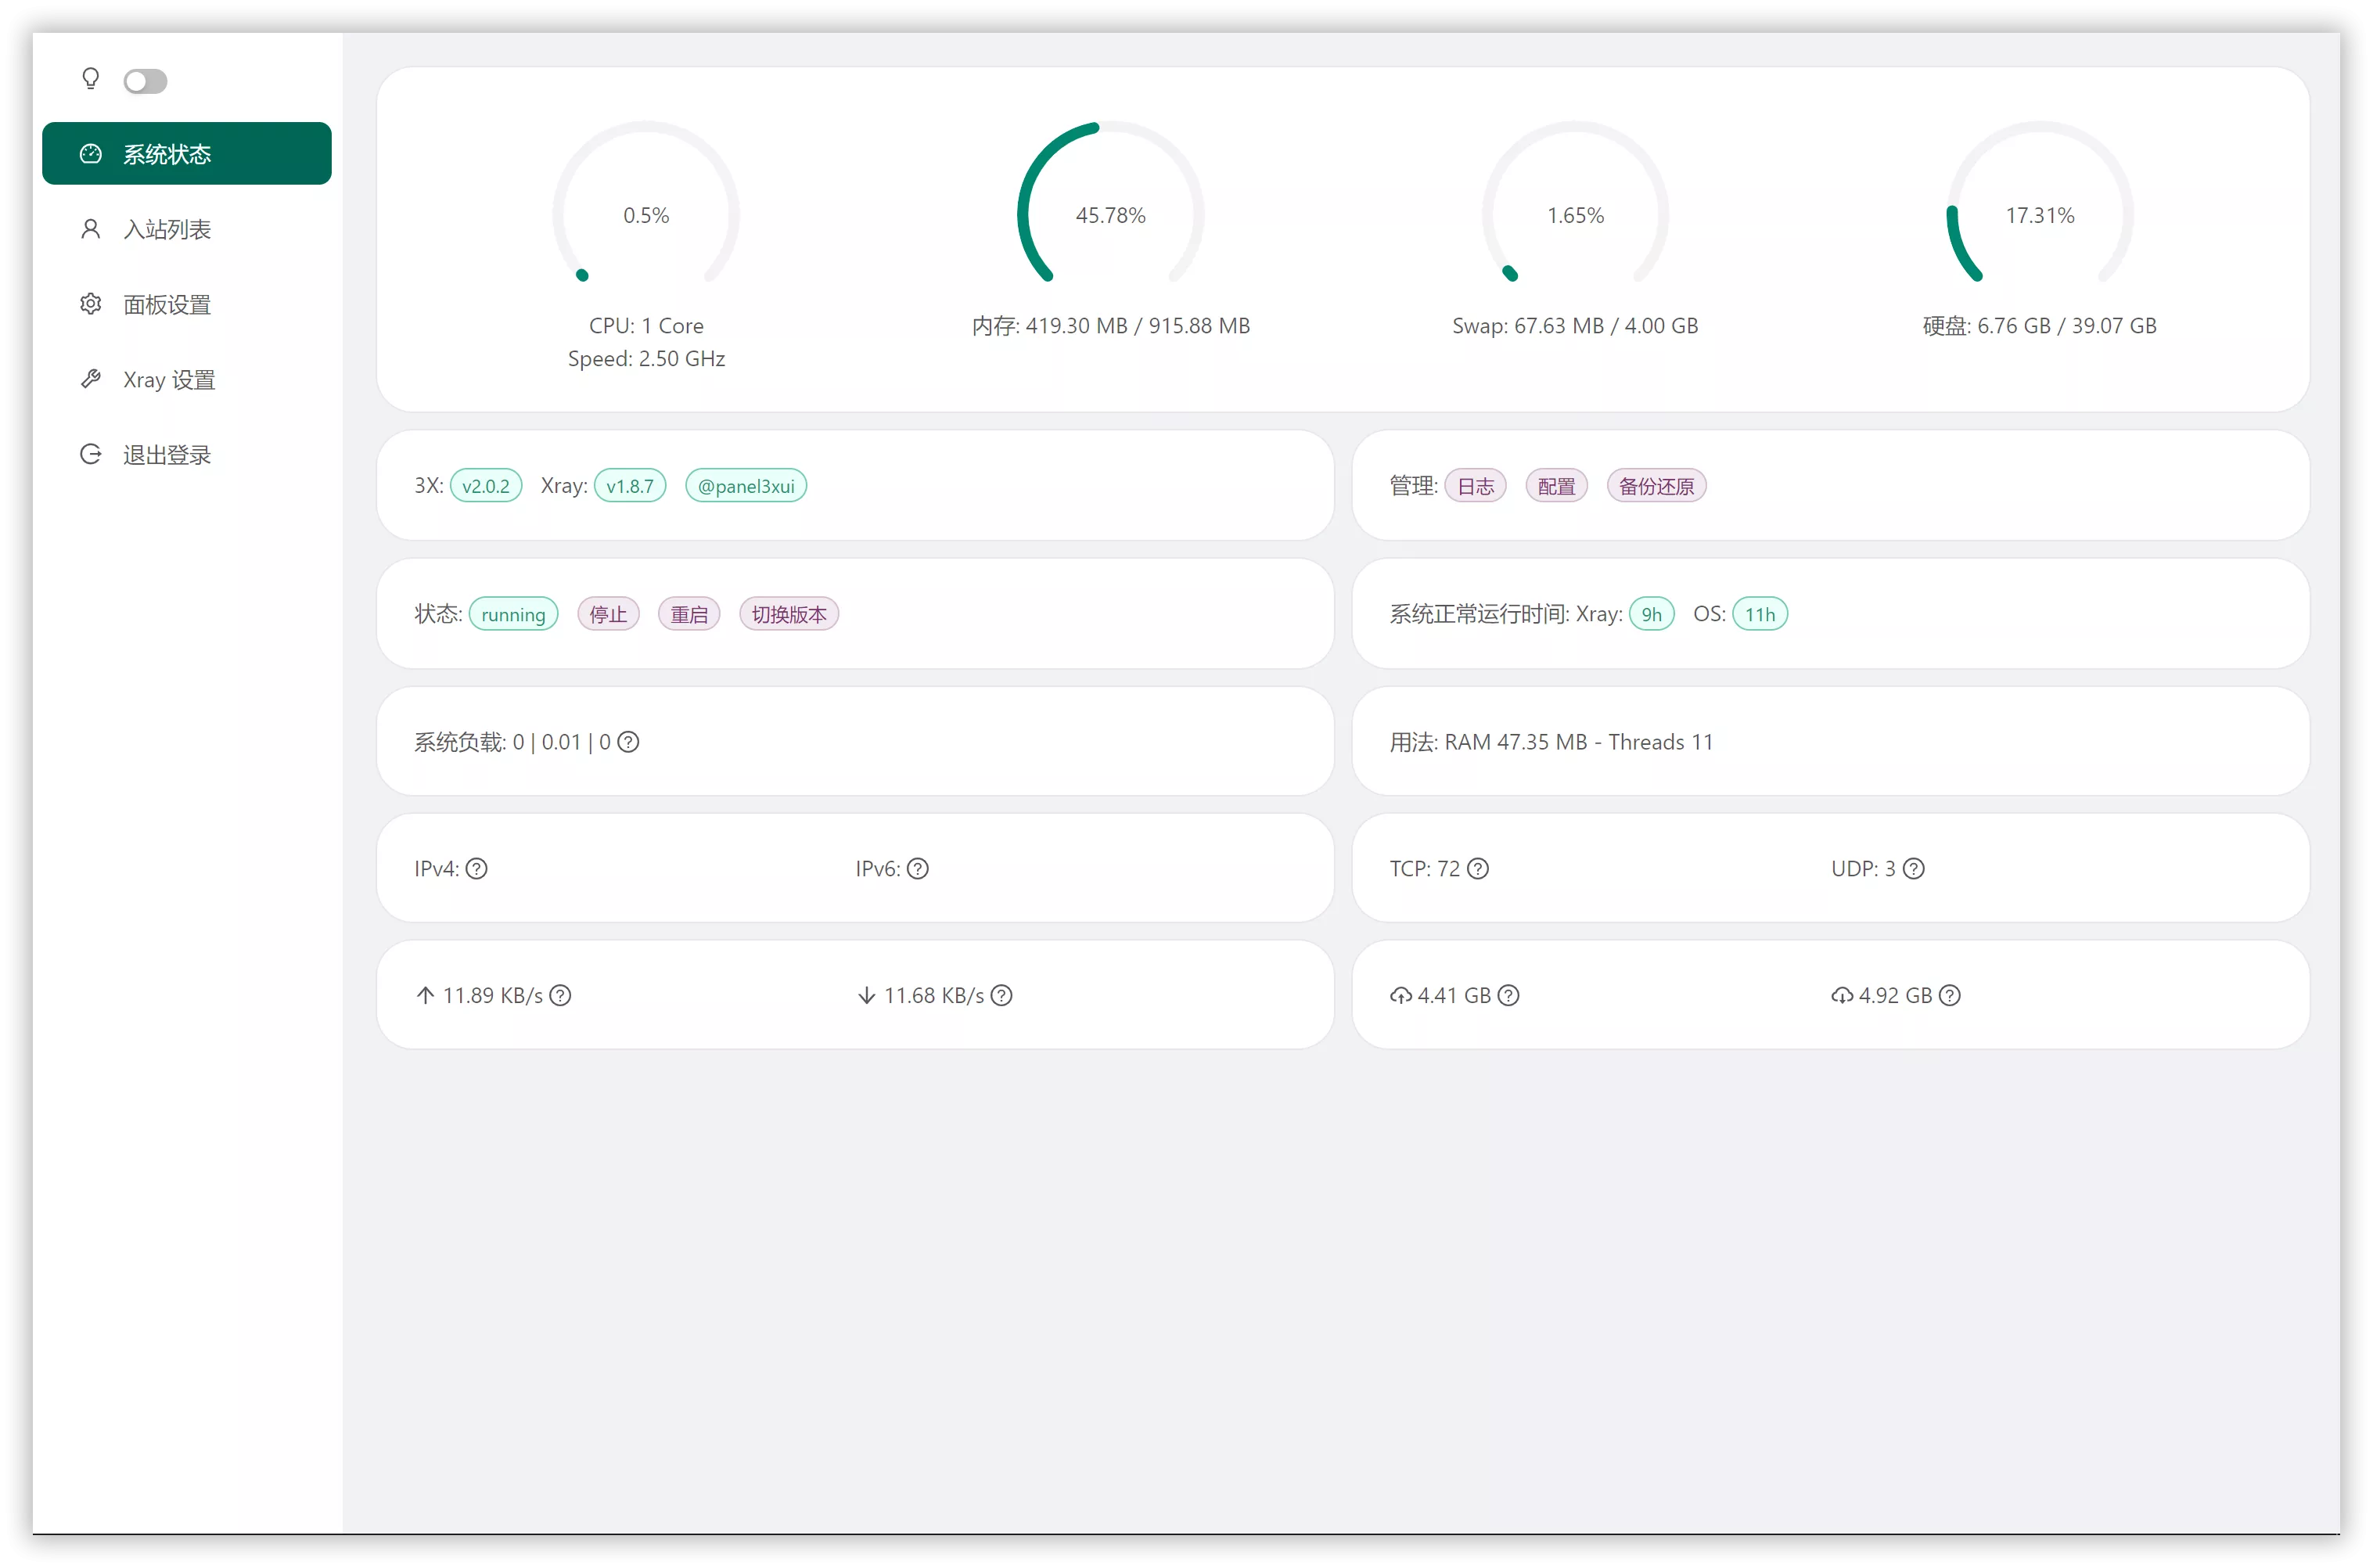
In your browser's address bar, enter Server_IP:10000 to access the 3x-ui dashboard. At the bottom of the page, switch the language to English (or your preferred language) and log in. The dashboard interface is shown below:
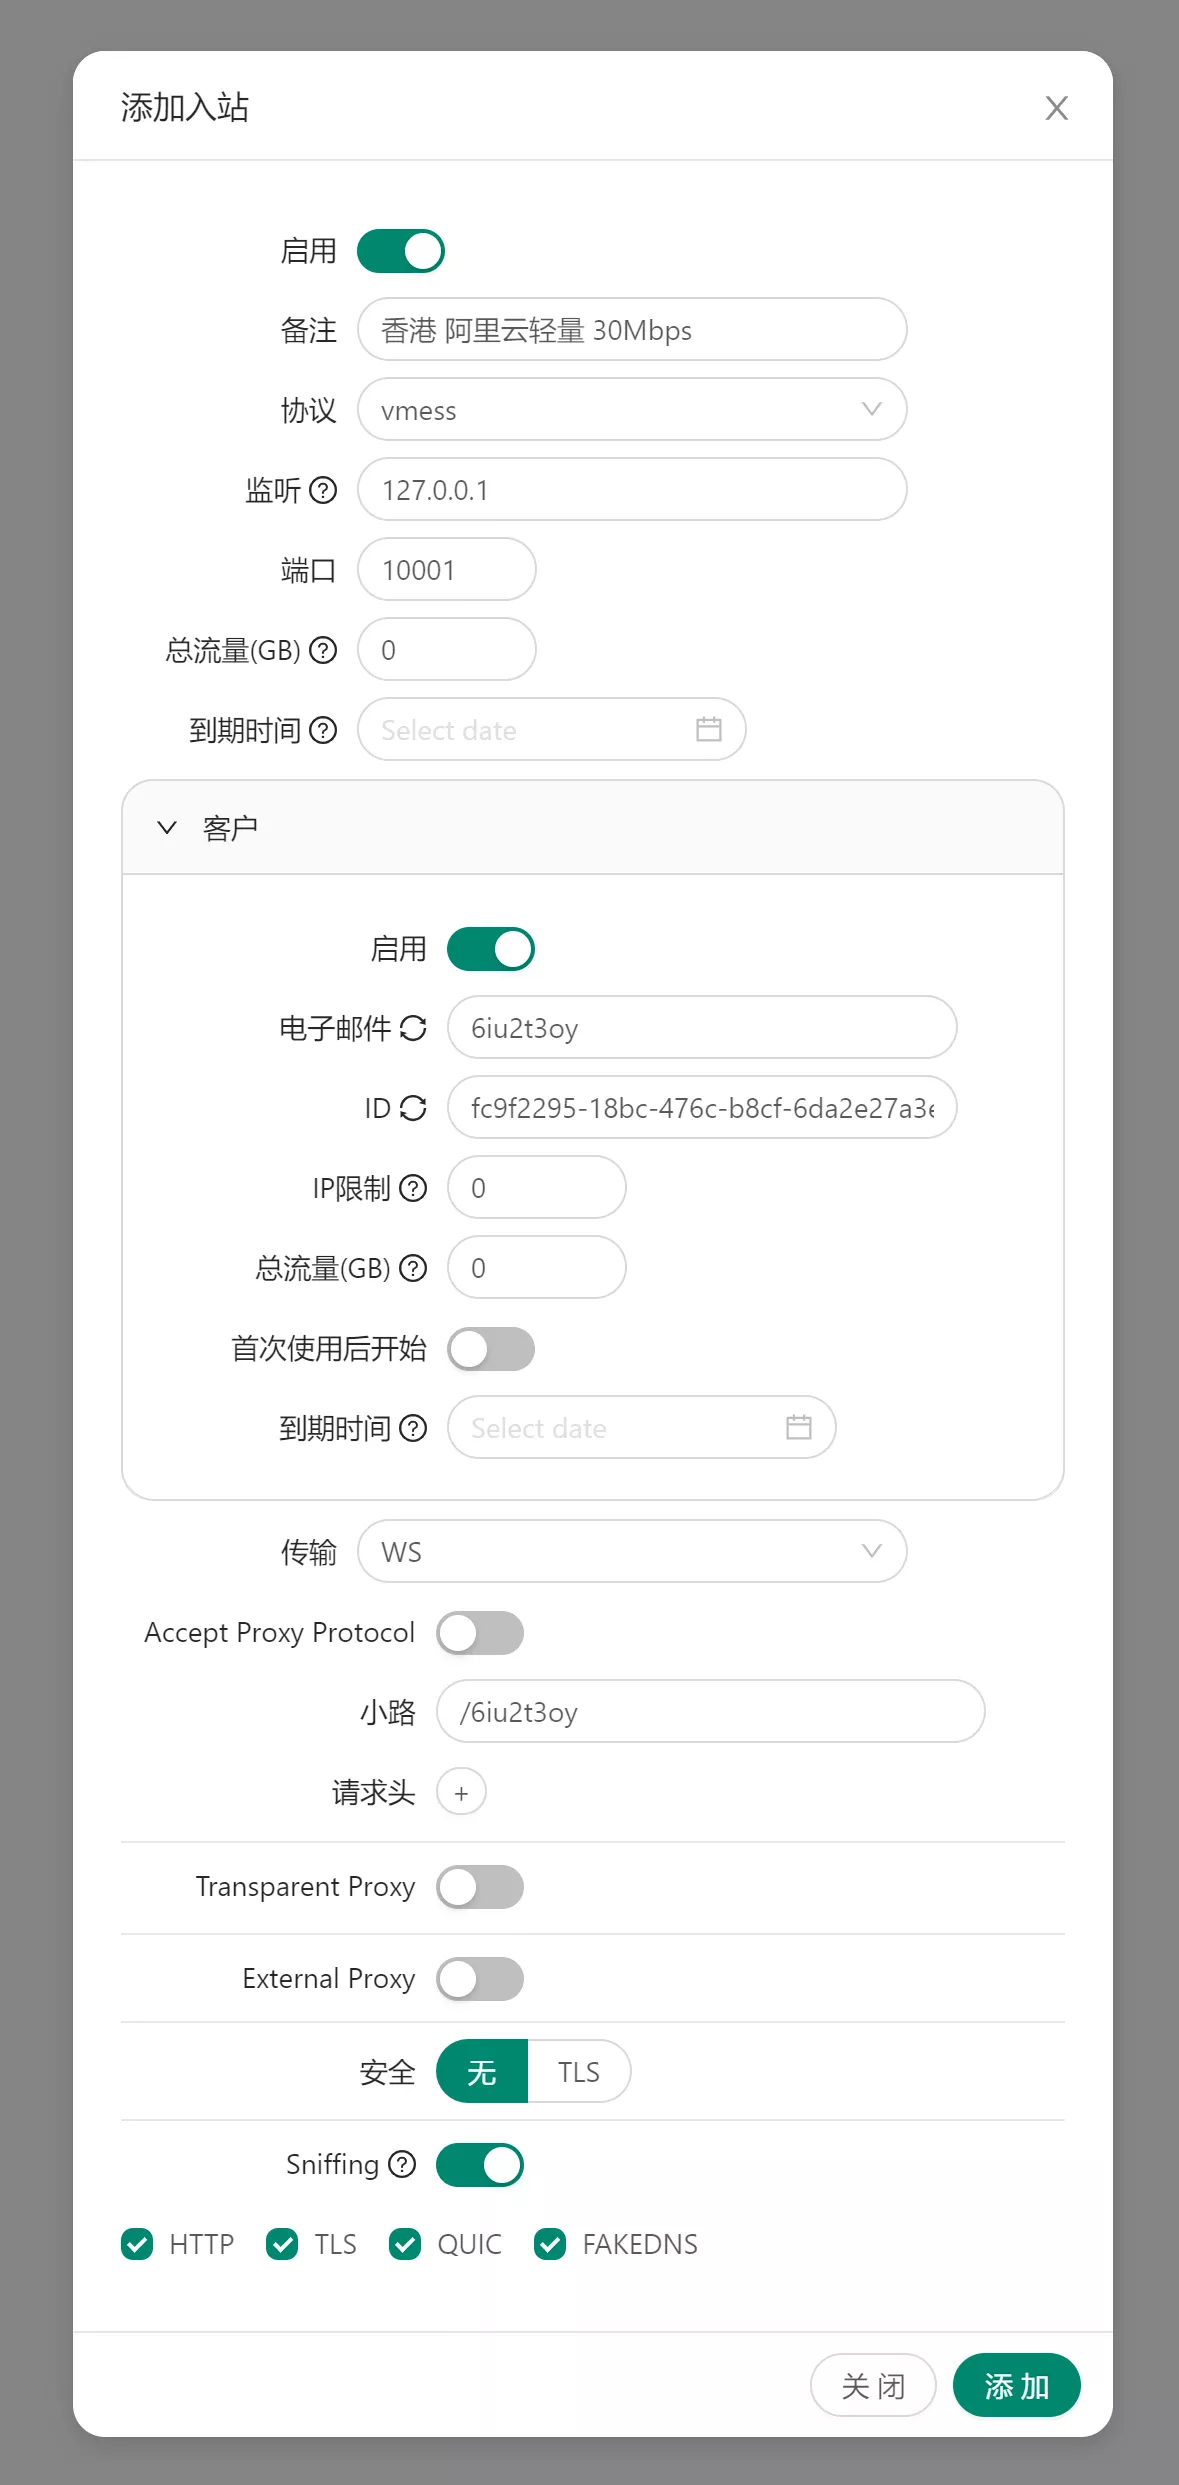
Creating a New Inbound (Node)
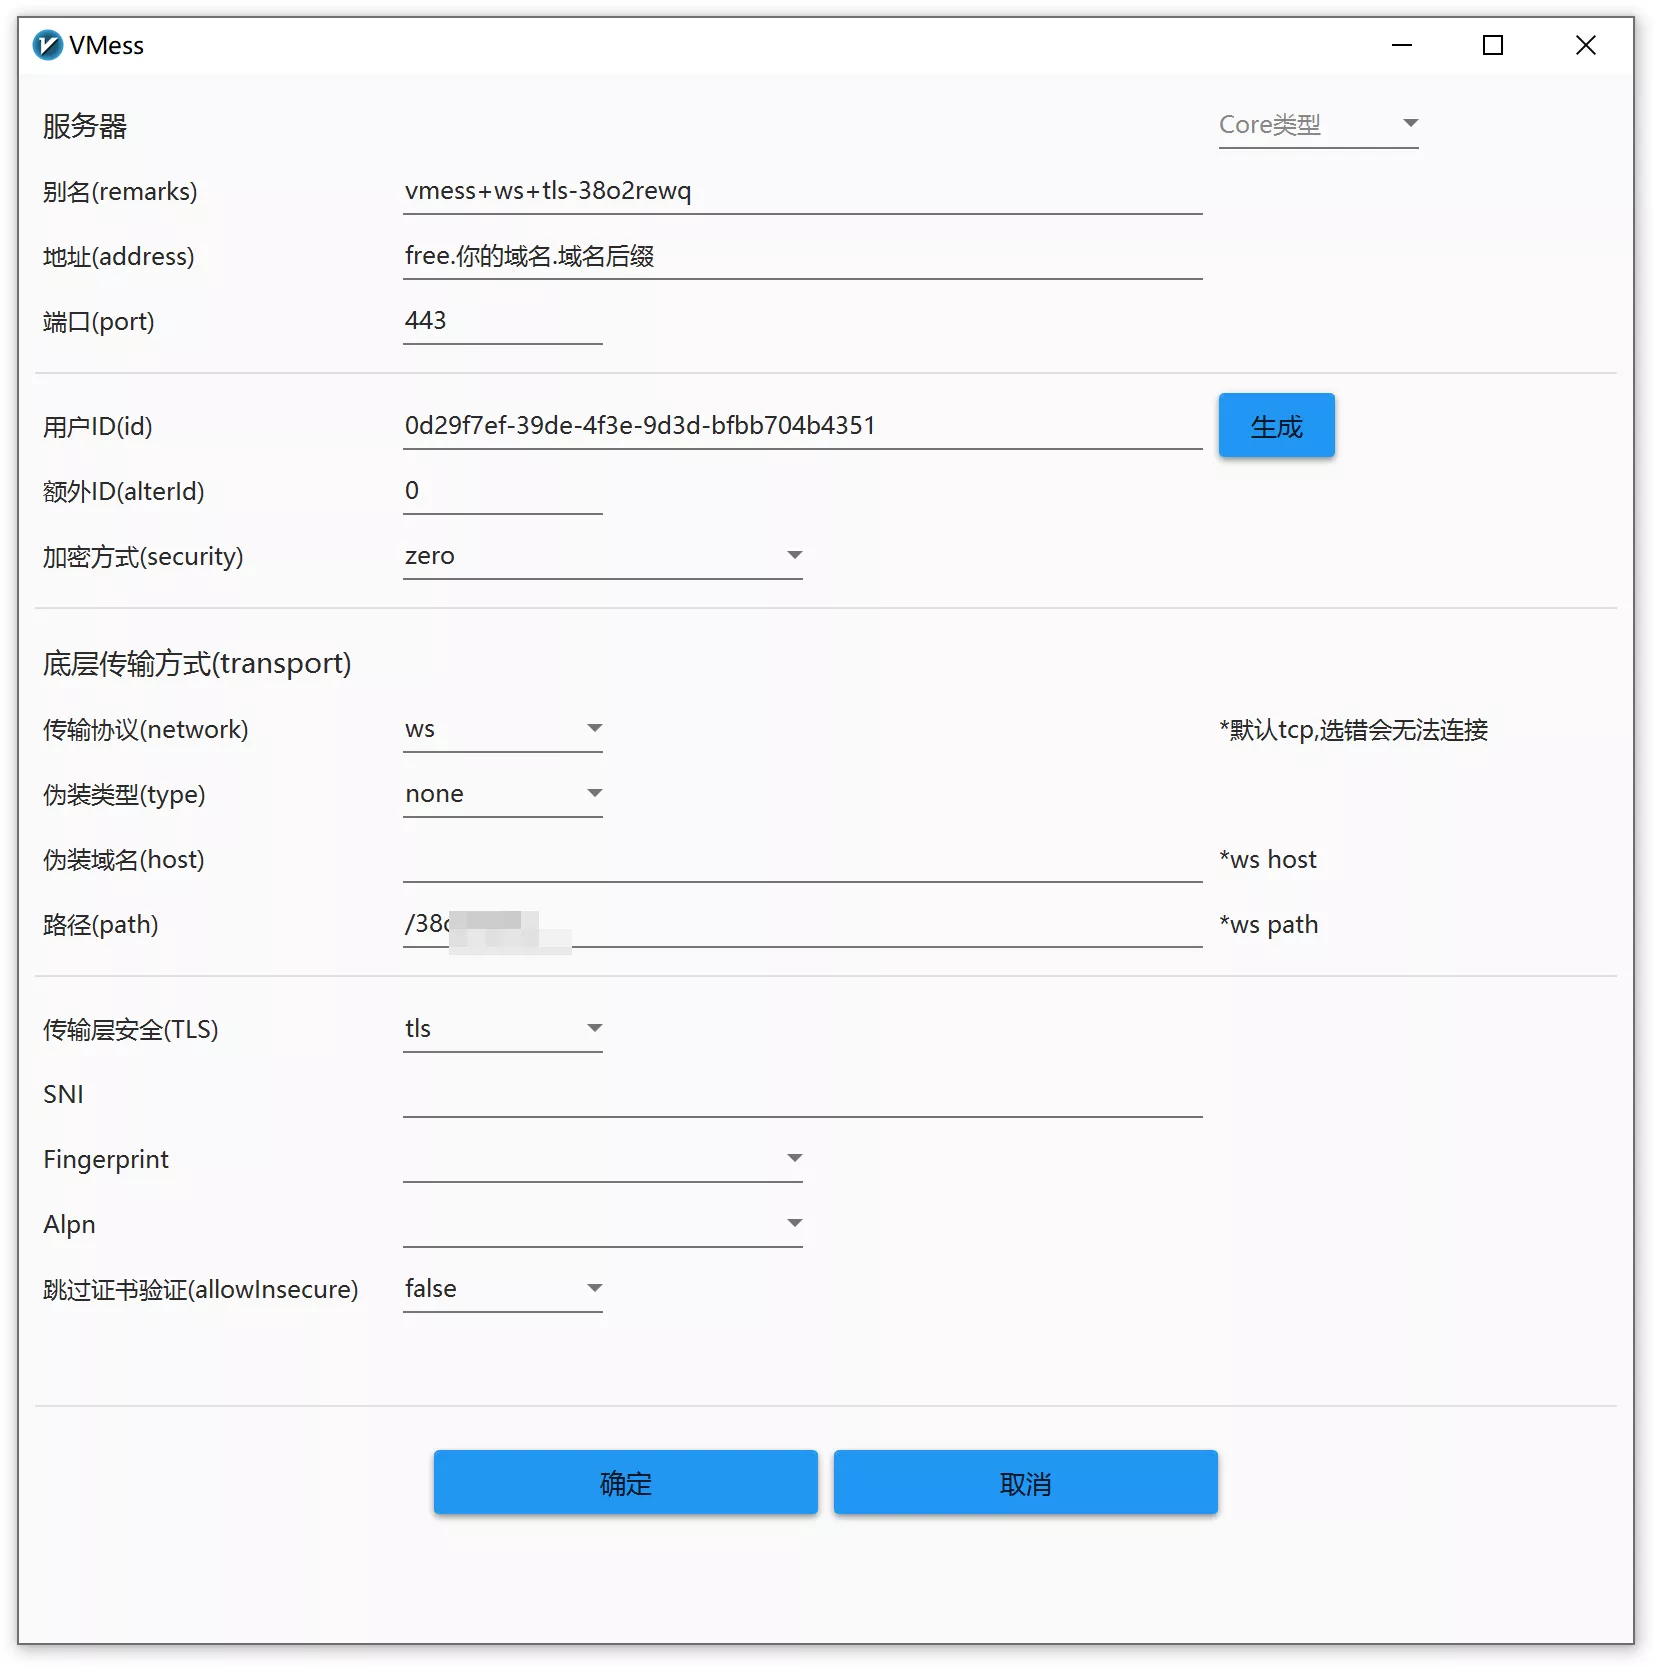
On the left sidebar, select Inbound List, then click Add Inbound (this essentially means creating a new node). Configure the settings as follows:
Remark: This is your node name. A common naming convention is: Region + Provider + Speed/Data Limit (e.g., HK-VMRack-Unlimited).
Protocol: Change this to vmess.
Listen: Change this to 127.0.0.1.
Port: It is recommended to set this to 10001 (this will be used later).
Transmission: Set this to WS (WebSocket).
Path: Copy the randomly generated Email from the "Clients" section and paste it into the Path field. Important: Make sure to add a forward slash (
/) at the beginning. Remember this path, as it is required for the next steps.Other Settings: Leave all other options at their default values.
Refer to the image below for the exact configuration:
nstalling OpenResty (Nginx), Creating a Website, and Applying for SSL
Log in to your 1Panel dashboard, navigate to the Websites section, and click One-click Install for OpenResty.
Note: Nginx is a web server that integrates static website hosting with reverse proxy capabilities. OpenResty can be simplified as an enhanced, high-performance version of Nginx.
Once installed, follow these steps to create a website:
Create a New Website: Select Reverse Proxy as the website type.
Primary Domain: Enter your subdomain, for example:
free.your-domain.com.Proxy Address: For now, enter
https://www.baidu.comas a placeholder.Confirm: Click OK to add the website.

After the website is successfully added, it will appear in the website list. Click the small folder icon in the list to open the website directory, select the "proxy" folder, open the "root.conf" file, select and delete all existing content, and then paste the following content:
location / {
    proxy_pass https://repo1.maven.org/; #伪装网址
    proxy_redirect off;
    proxy_ssl_server_name on;
    sub_filter_once off;
    sub_filter "repo1.maven.org" $server_name;
    proxy_set_header Host "repo1.maven.org";
    proxy_set_header Referer $http_referer;
    proxy_set_header X-Real-IP $remote_addr;
    proxy_set_header User-Agent $http_user_agent;
    proxy_set_header X-Forwarded-For $proxy_add_x_forwarded_for;
    proxy_set_header X-Forwarded-Proto https;
    proxy_set_header Accept-Encoding "";
    proxy_set_header Accept-Language "zh-CN";
}


location /um1mo9a {   #分流路径
    proxy_redirect off;
    proxy_pass http://127.0.0.1:10001; #入站端口
    proxy_http_version 1.1;
    proxy_set_header Upgrade $http_upgrade;
    proxy_set_header Connection "upgrade";
    proxy_set_header Host $host;
    proxy_set_header X-Real-IP $remote_addr;
    proxy_set_header X-Forwarded-For $proxy_add_x_forwarded_for;
}
Explanation of the Configuration File:
Traffic Routing Path: You must change the routing path to match the "Path" you specified when creating the node. This ensures that only requests directed to this specific path will be forwarded to the node you built.
Camouflage Site: Under normal circumstances, if you enter
free.your-domain.cominto a browser, it will redirect to a camouflage site. In this setup, we use the Maven Central Repository as the fake site because it naturally exhibits high-traffic characteristics. You can use any other website as a substitute, provided it is a high-traffic site.Effectiveness: Every time you save the configuration file, you must Restart or Reload Nginx; otherwise, the changes will not take effect.
Applying for an SSL Certificate
After saving the root.conf configuration file, we need to apply for an SSL certificate to secure the connection.
In the 1Panel dashboard, select Websites -> Certificates from the left sidebar.
Click on ACME Account and select Create ACME Account.
Enter your commonly used email address, leave the other settings at their defaults, and click OK.
Click the blue Apply for Certificate button and fill in the details as shown in the image below:
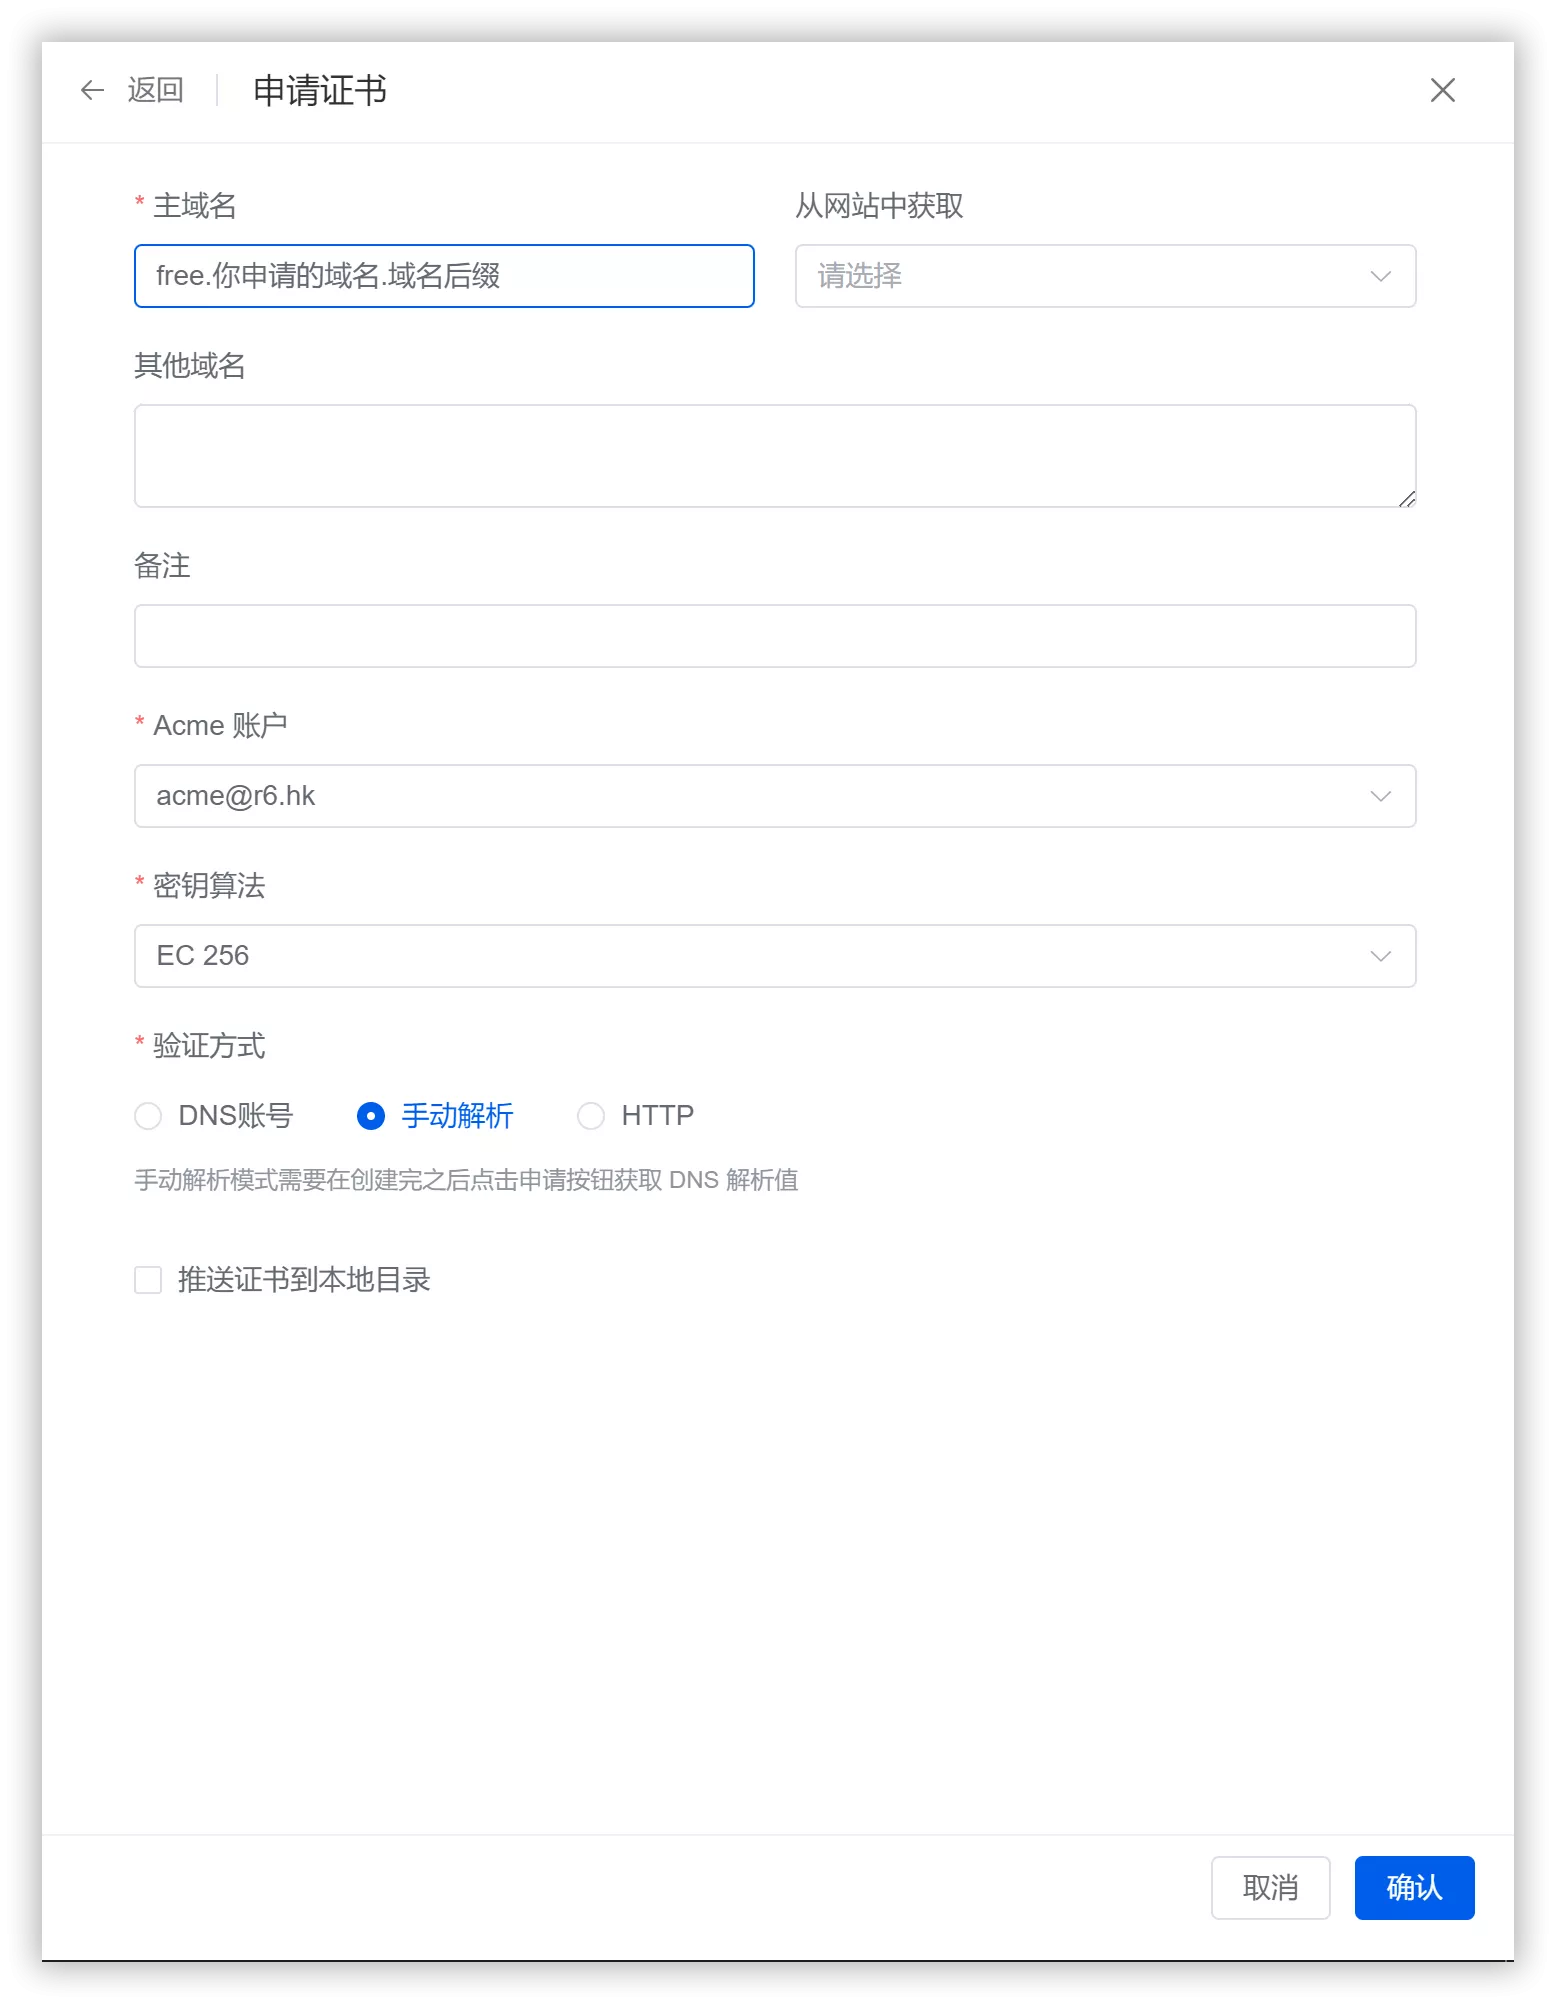
Click the confirmation button to return to the list. You will find that the certificate status is "Waiting for application." Click the "Apply" button, and you will be prompted to add the following DNS records at your DNS service provider:

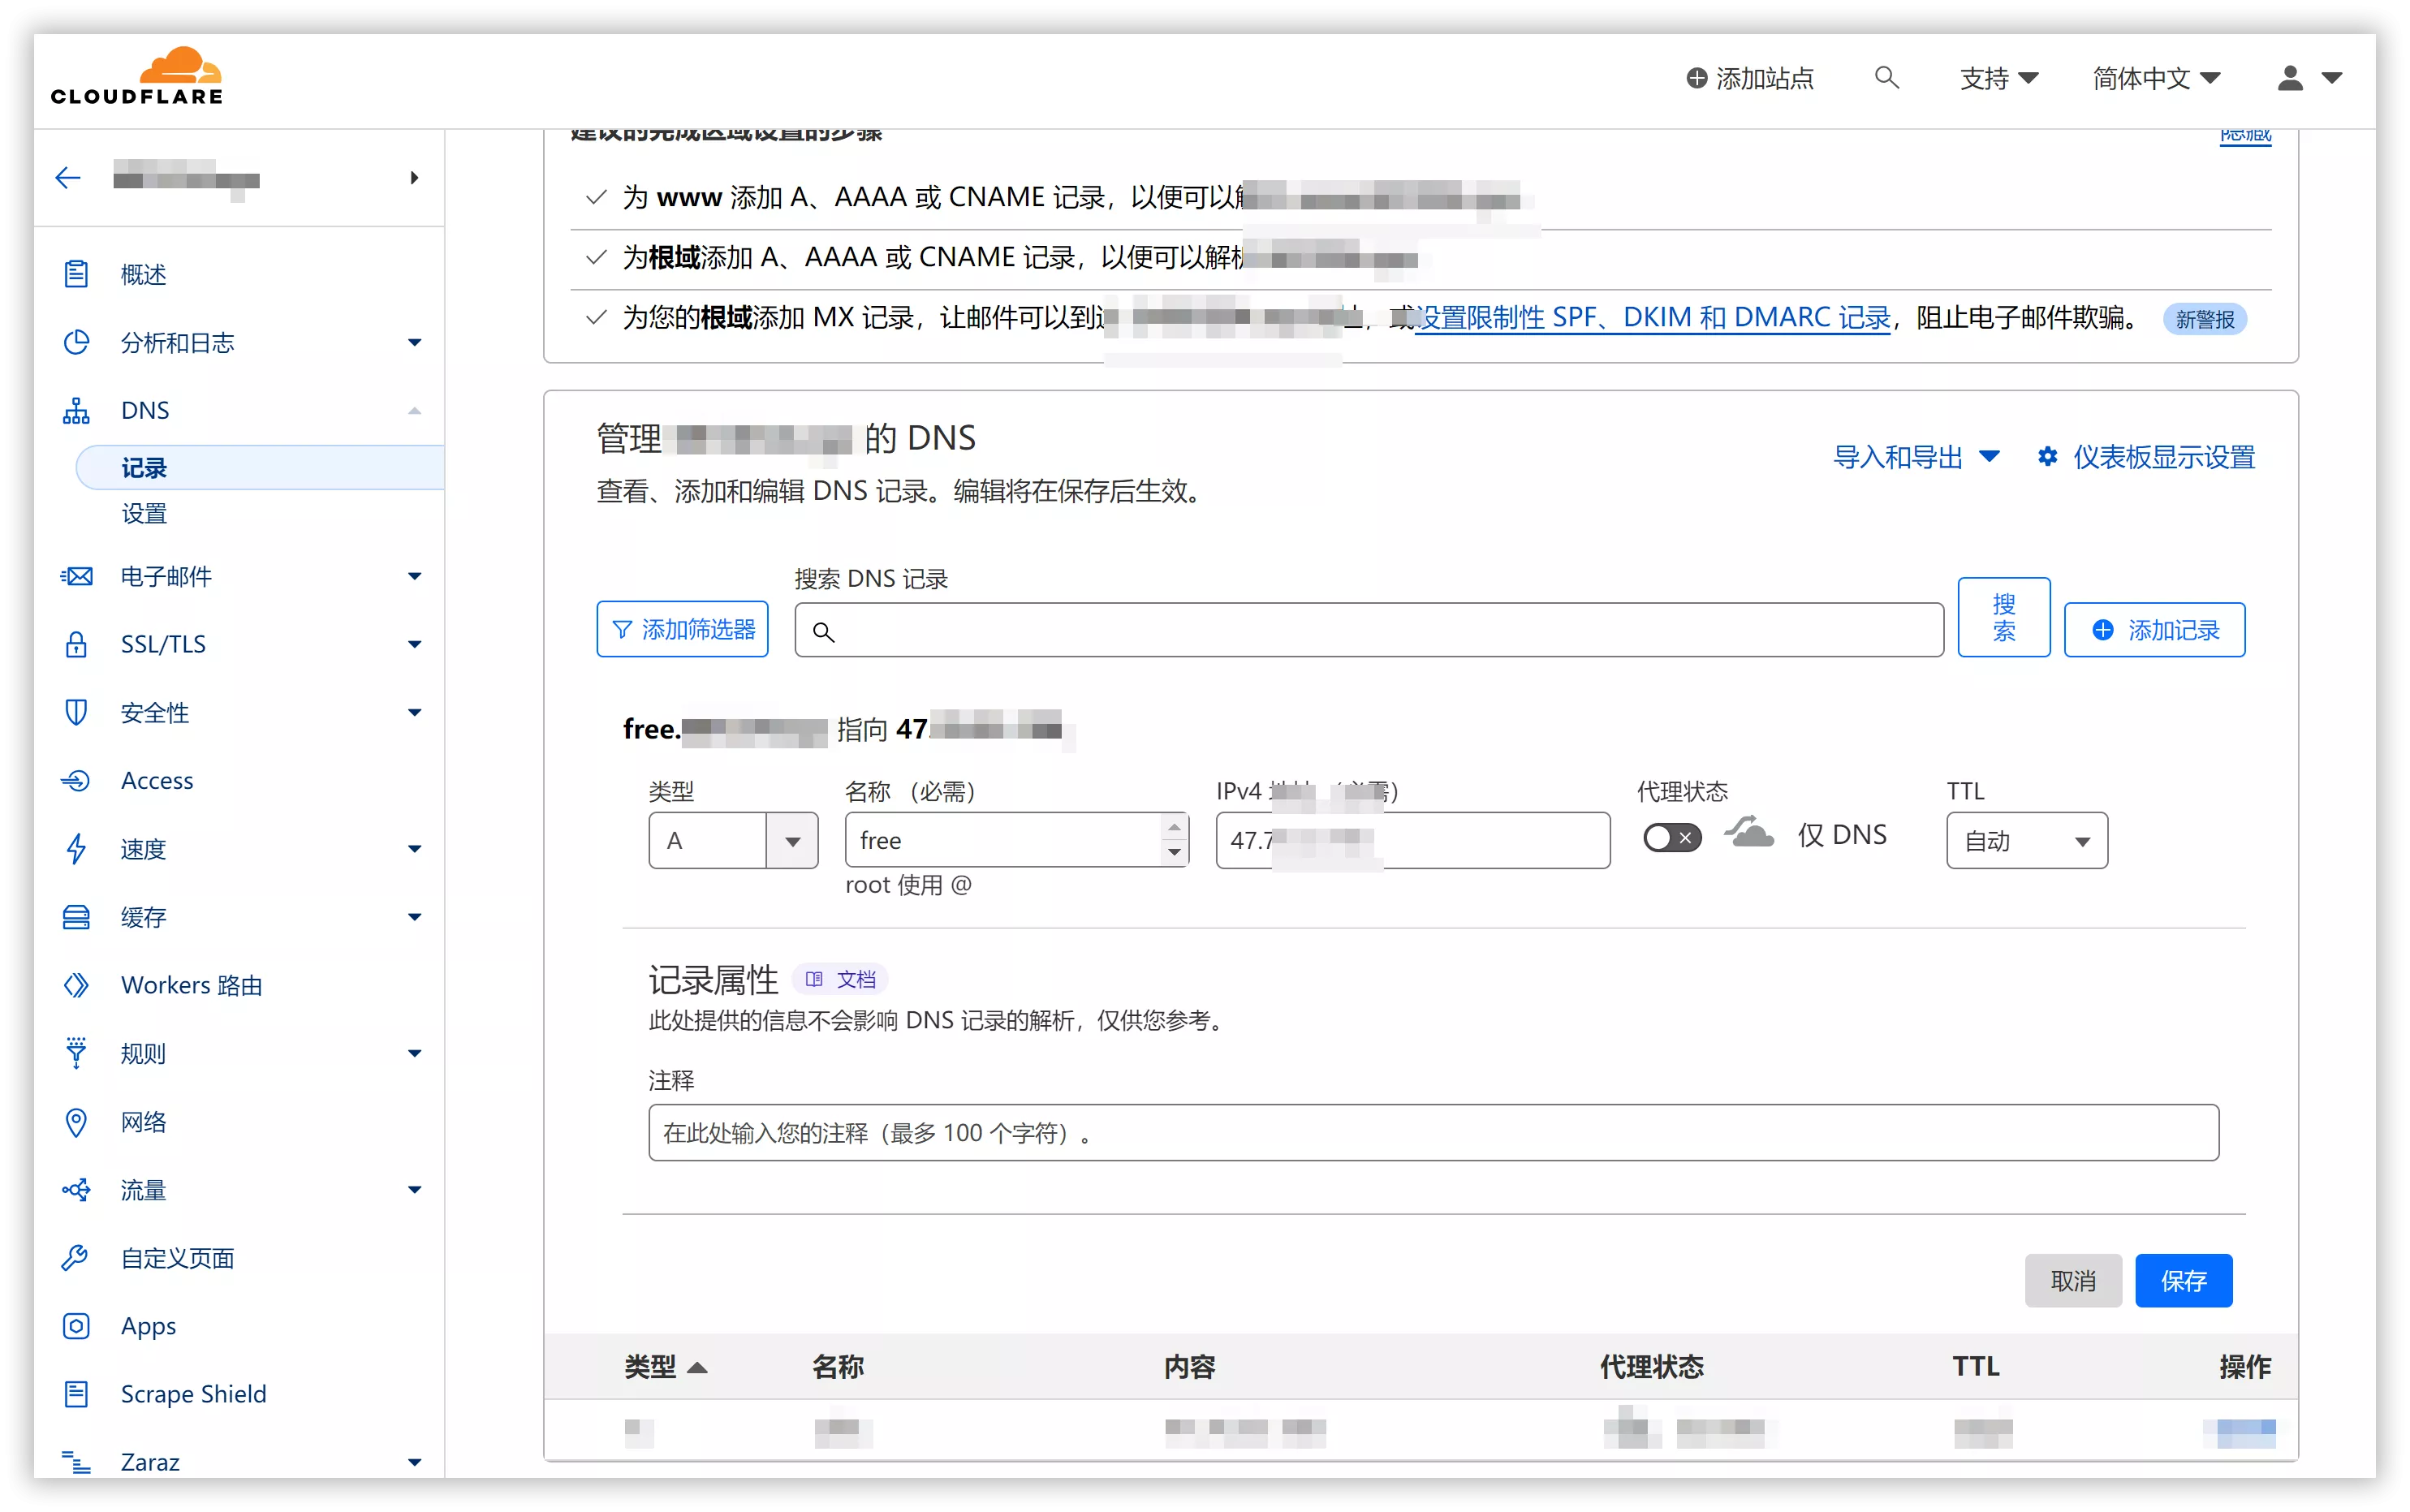
Adding DNS Records for Your Domain
If you have not changed your domain's Nameservers, you must add the DNS records at the registrar where you purchased your domain. You will need to add two DNS records. Below, we use Cloudflare as an example.
First, add the DNS record for your node:
Type: A
Name:
free(This creates the subdomainfree.your-domain.com)IPv4 Address: Enter your Server’s IP Address.
Proxy Status: If you are using Cloudflare, you must disable the proxy status (set it to DNS Only, represented by a gray cloud). Further explanation regarding this is provided at the end of the article.
Adding DNS Records for SSL Verification
In addition to the A record, you must add a DNS record for SSL Certificate Verification. This record acts as proof to the certificate authority (CA) that you own the domain, allowing the issuance process to proceed.
Record Type: Note that this DNS record must be of the TXT type.
Binding the Certificate to Your Website
Return to 1Panel. Once you have added the DNS record, click the Confirm button to finalize the certificate application. If your configuration is correct, the SSL certificate will be issued successfully.
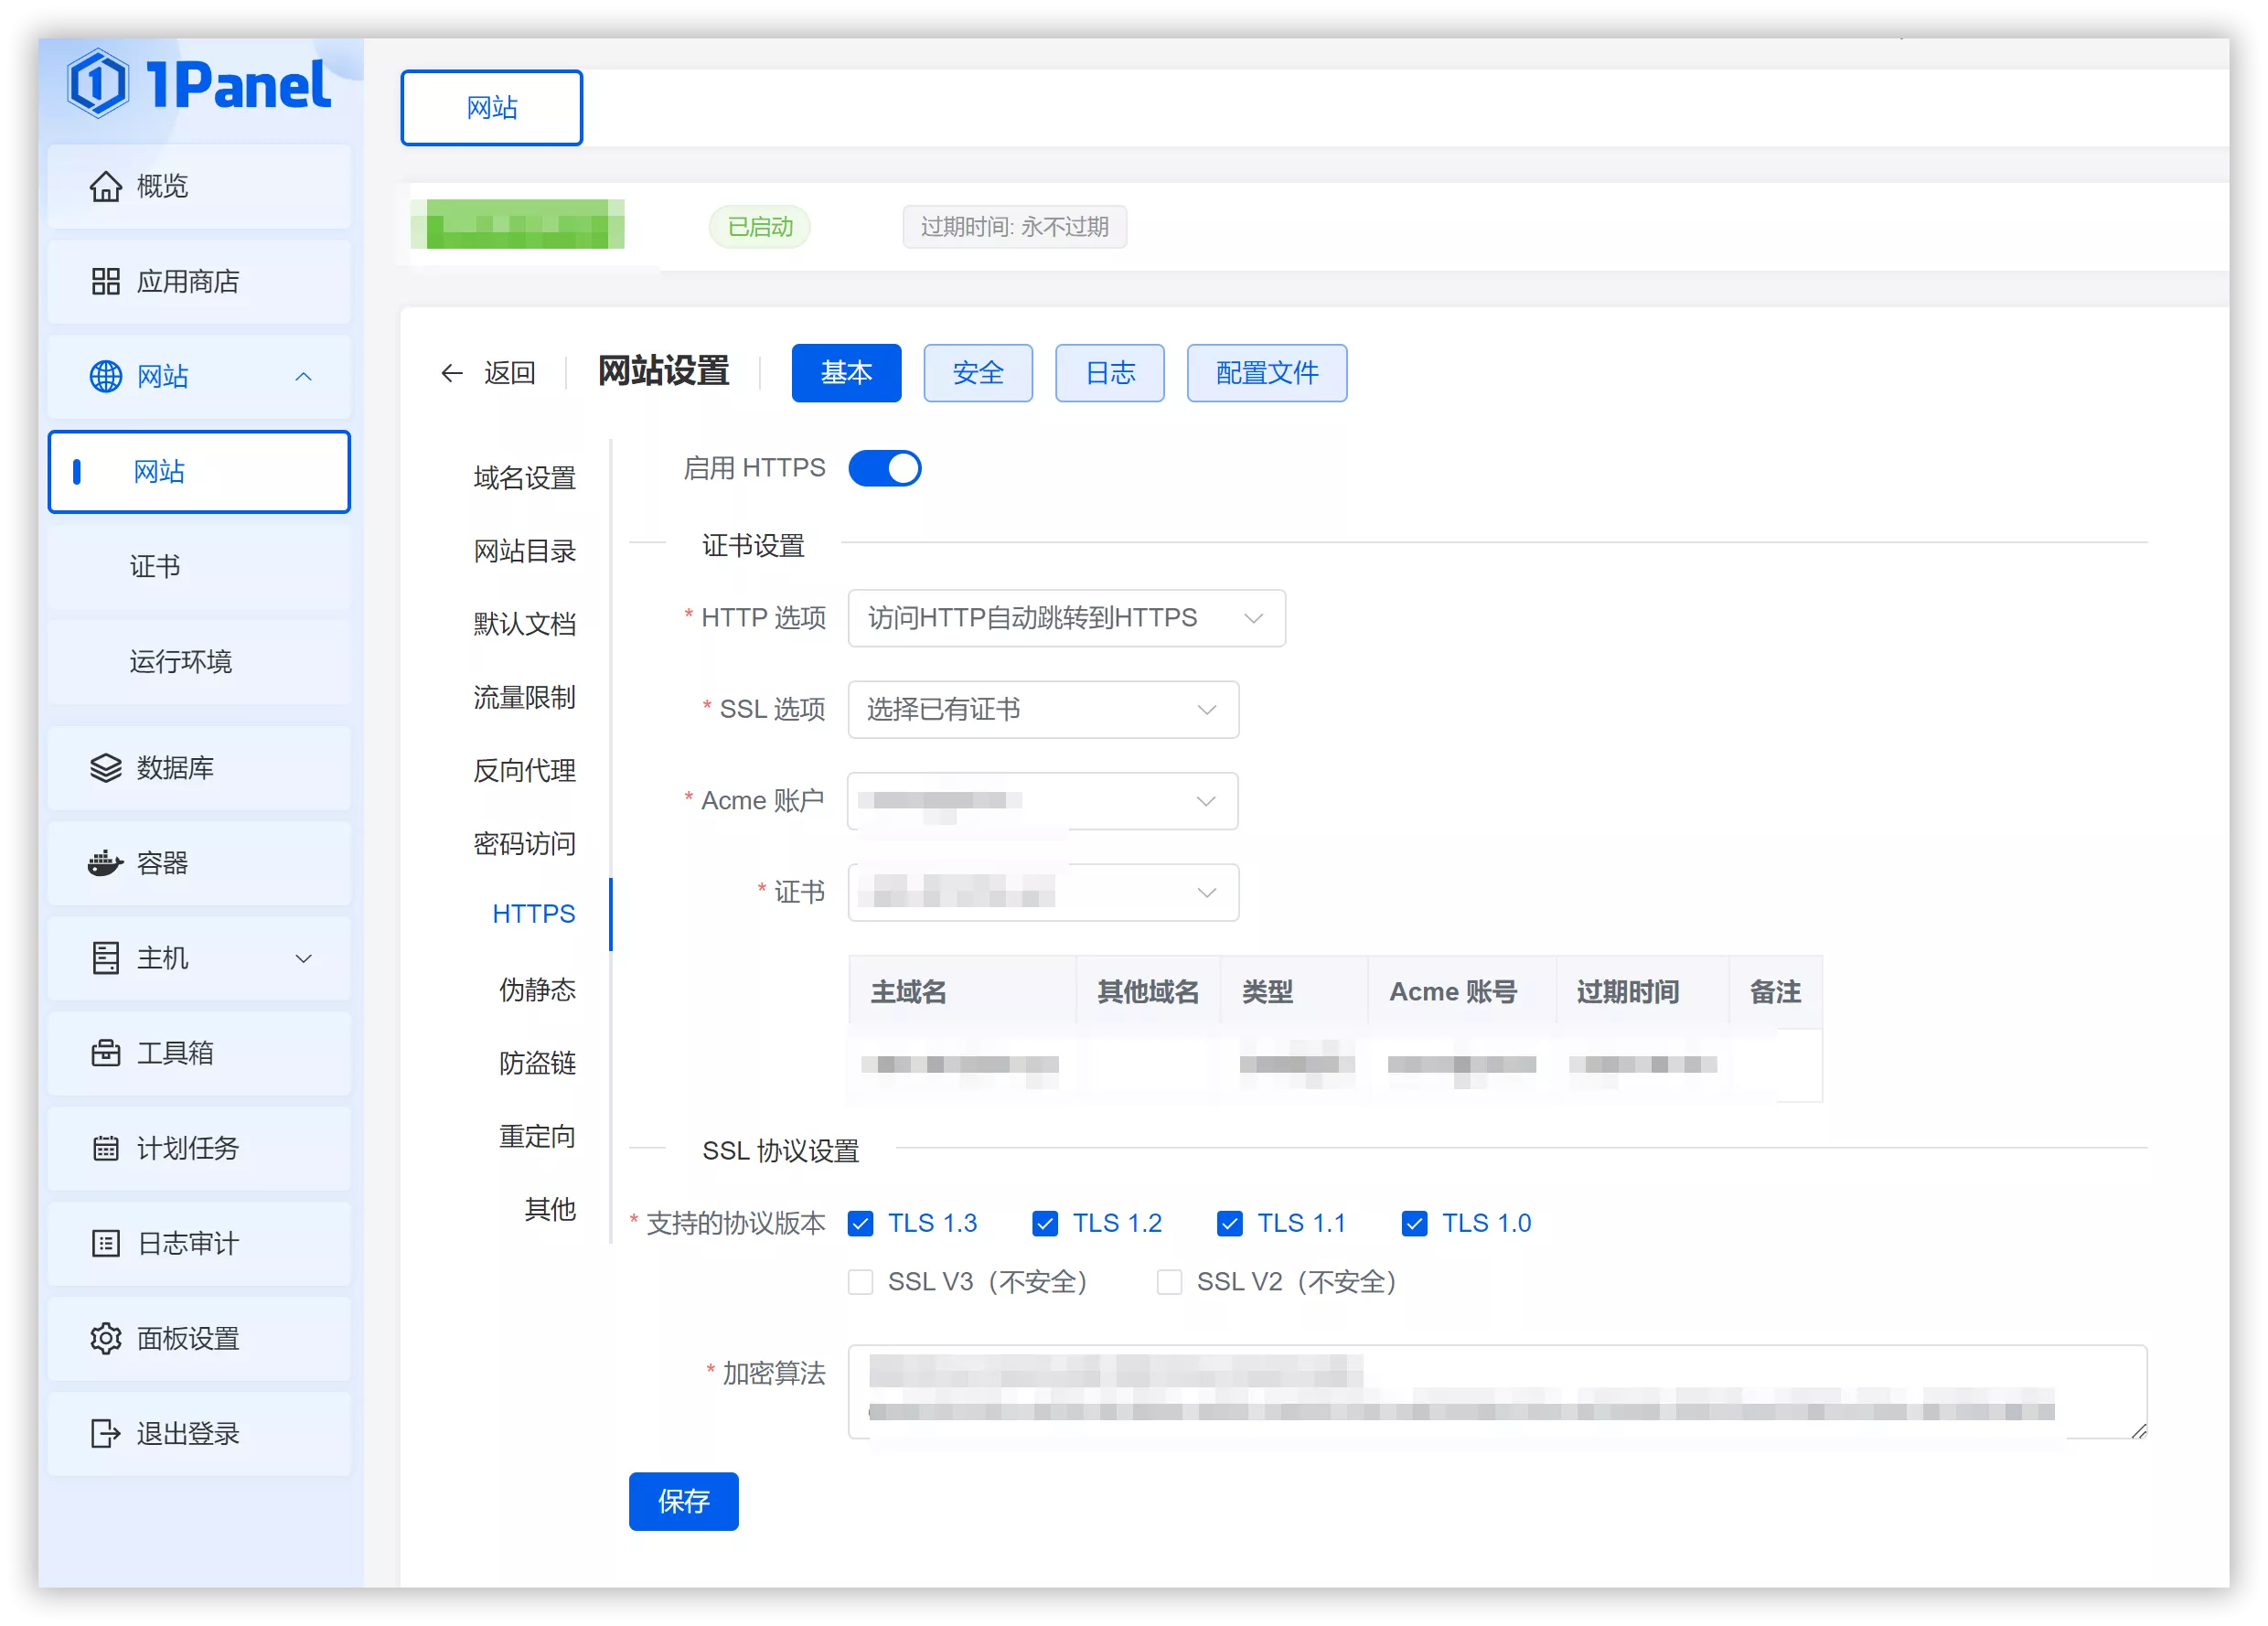
Now, follow these steps to bind the certificate to your website:
Open the Website List in 1Panel again.
Click Configuration for your specific site.
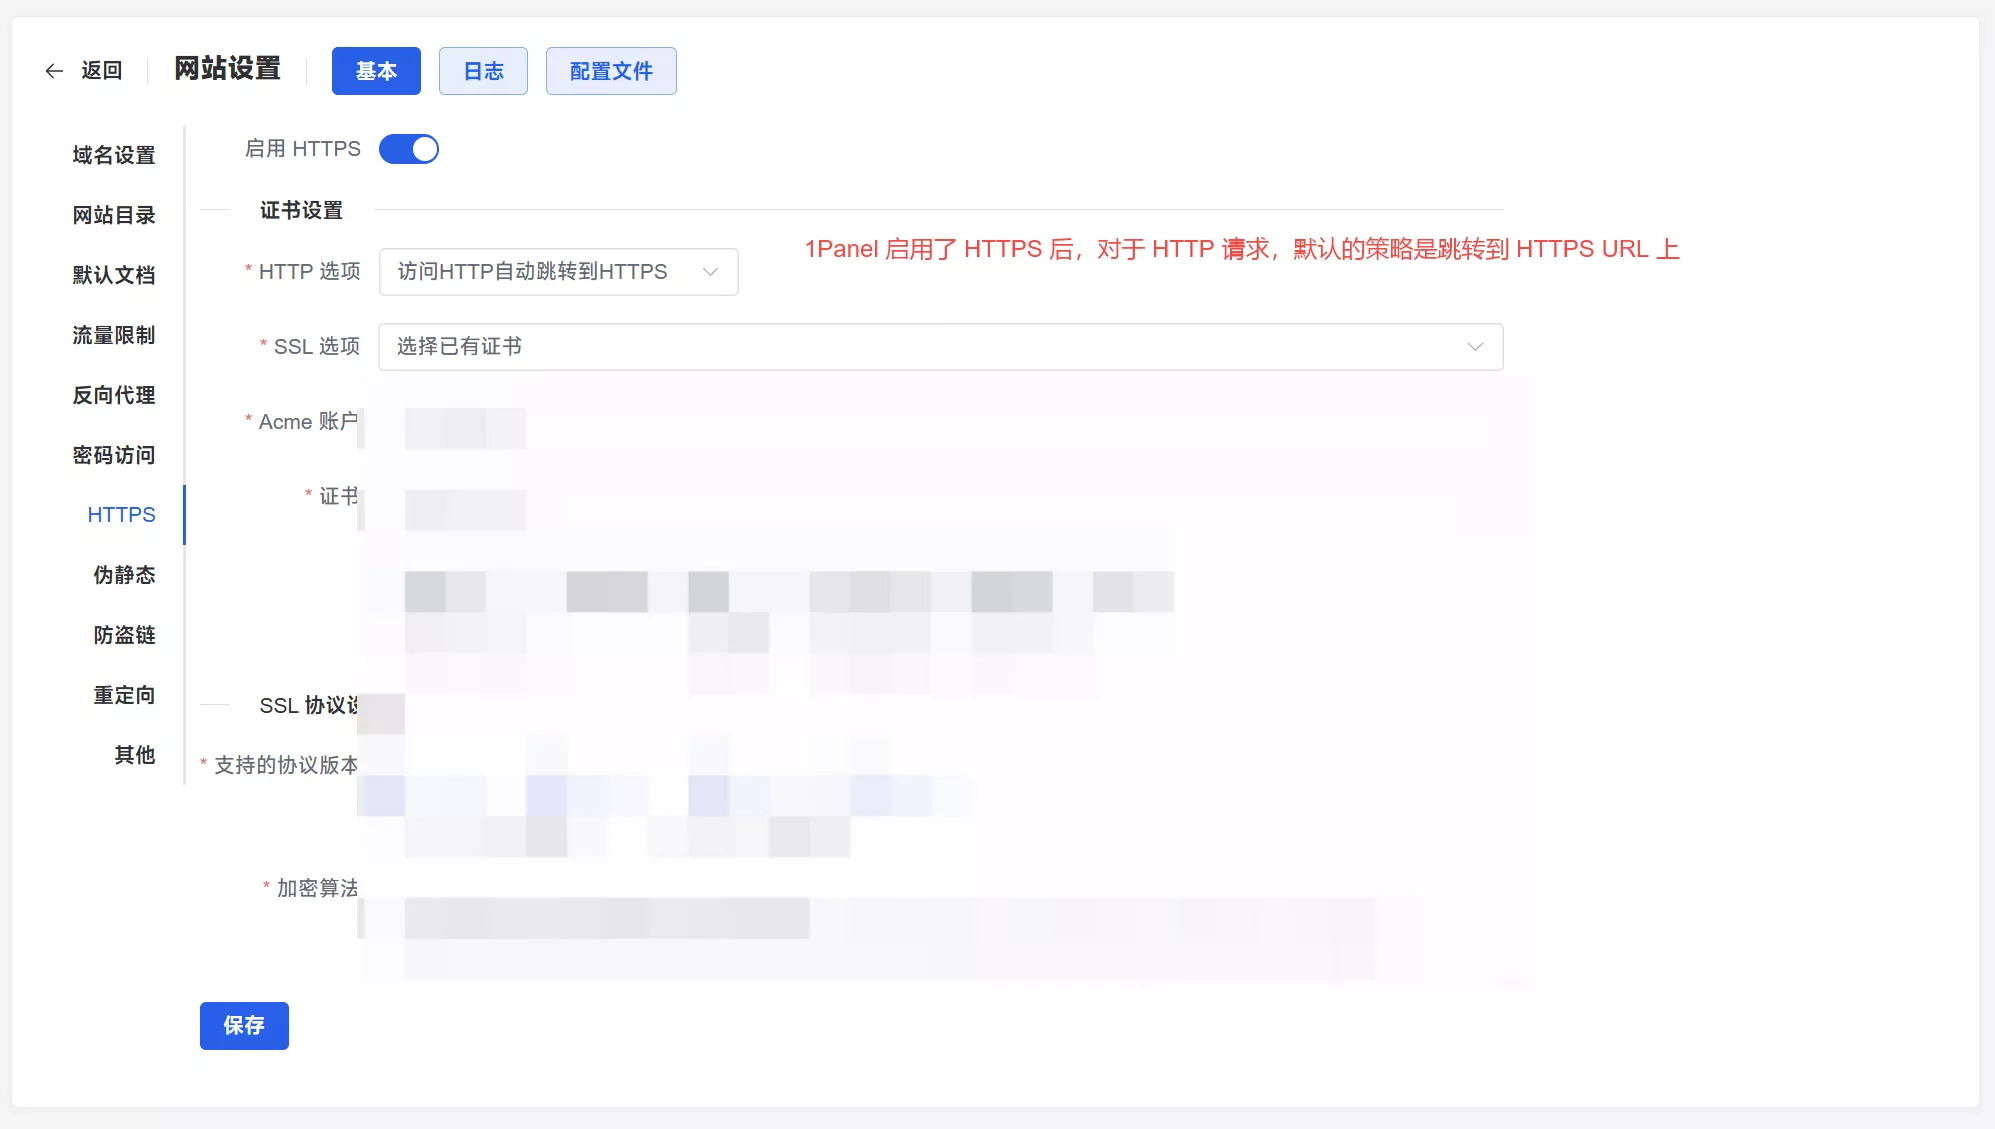
Select HTTPS from the sidebar.
Choose Enable HTTPS.
Select the SSL Certificate you just applied for from the dropdown menu.书:
Connecting to the Node
At this stage, the core setup of your node is complete. Now, let’s move on to the connection phase.
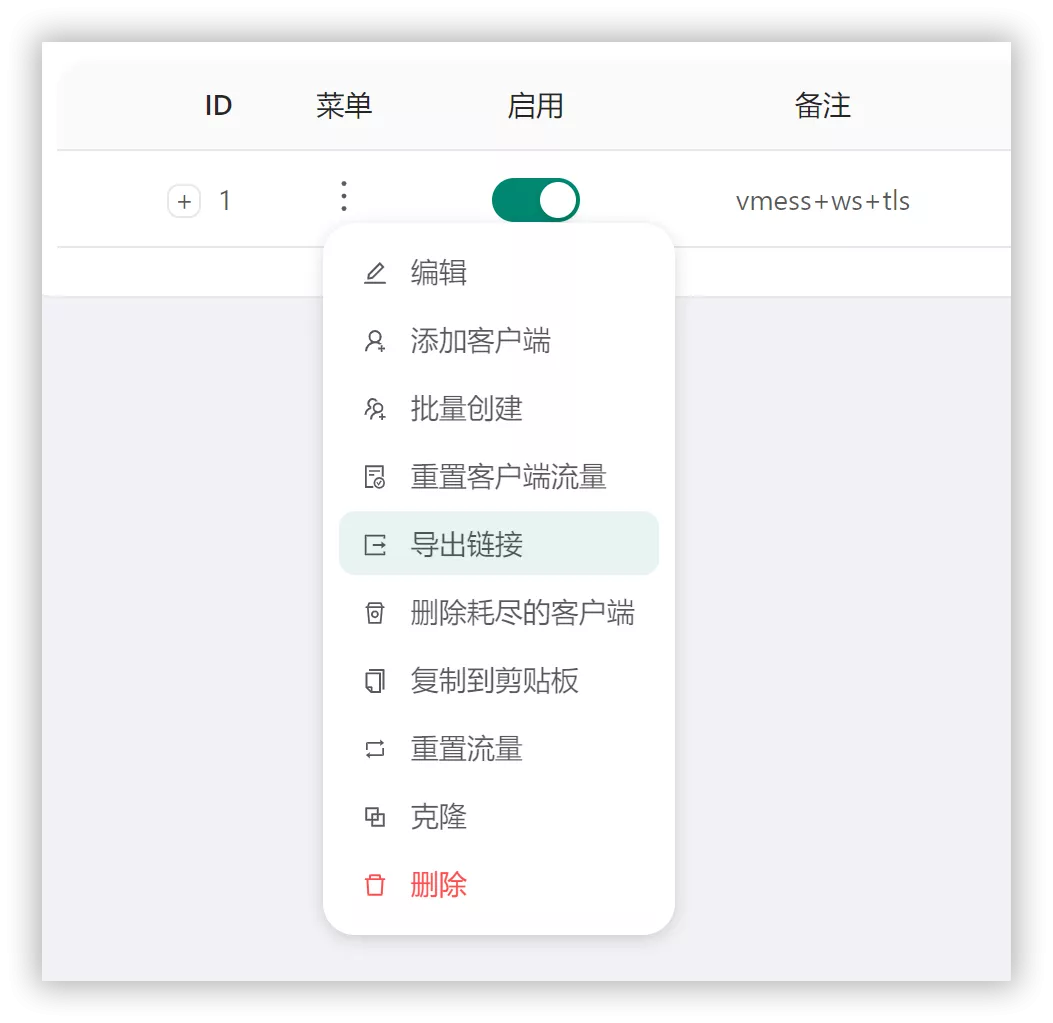
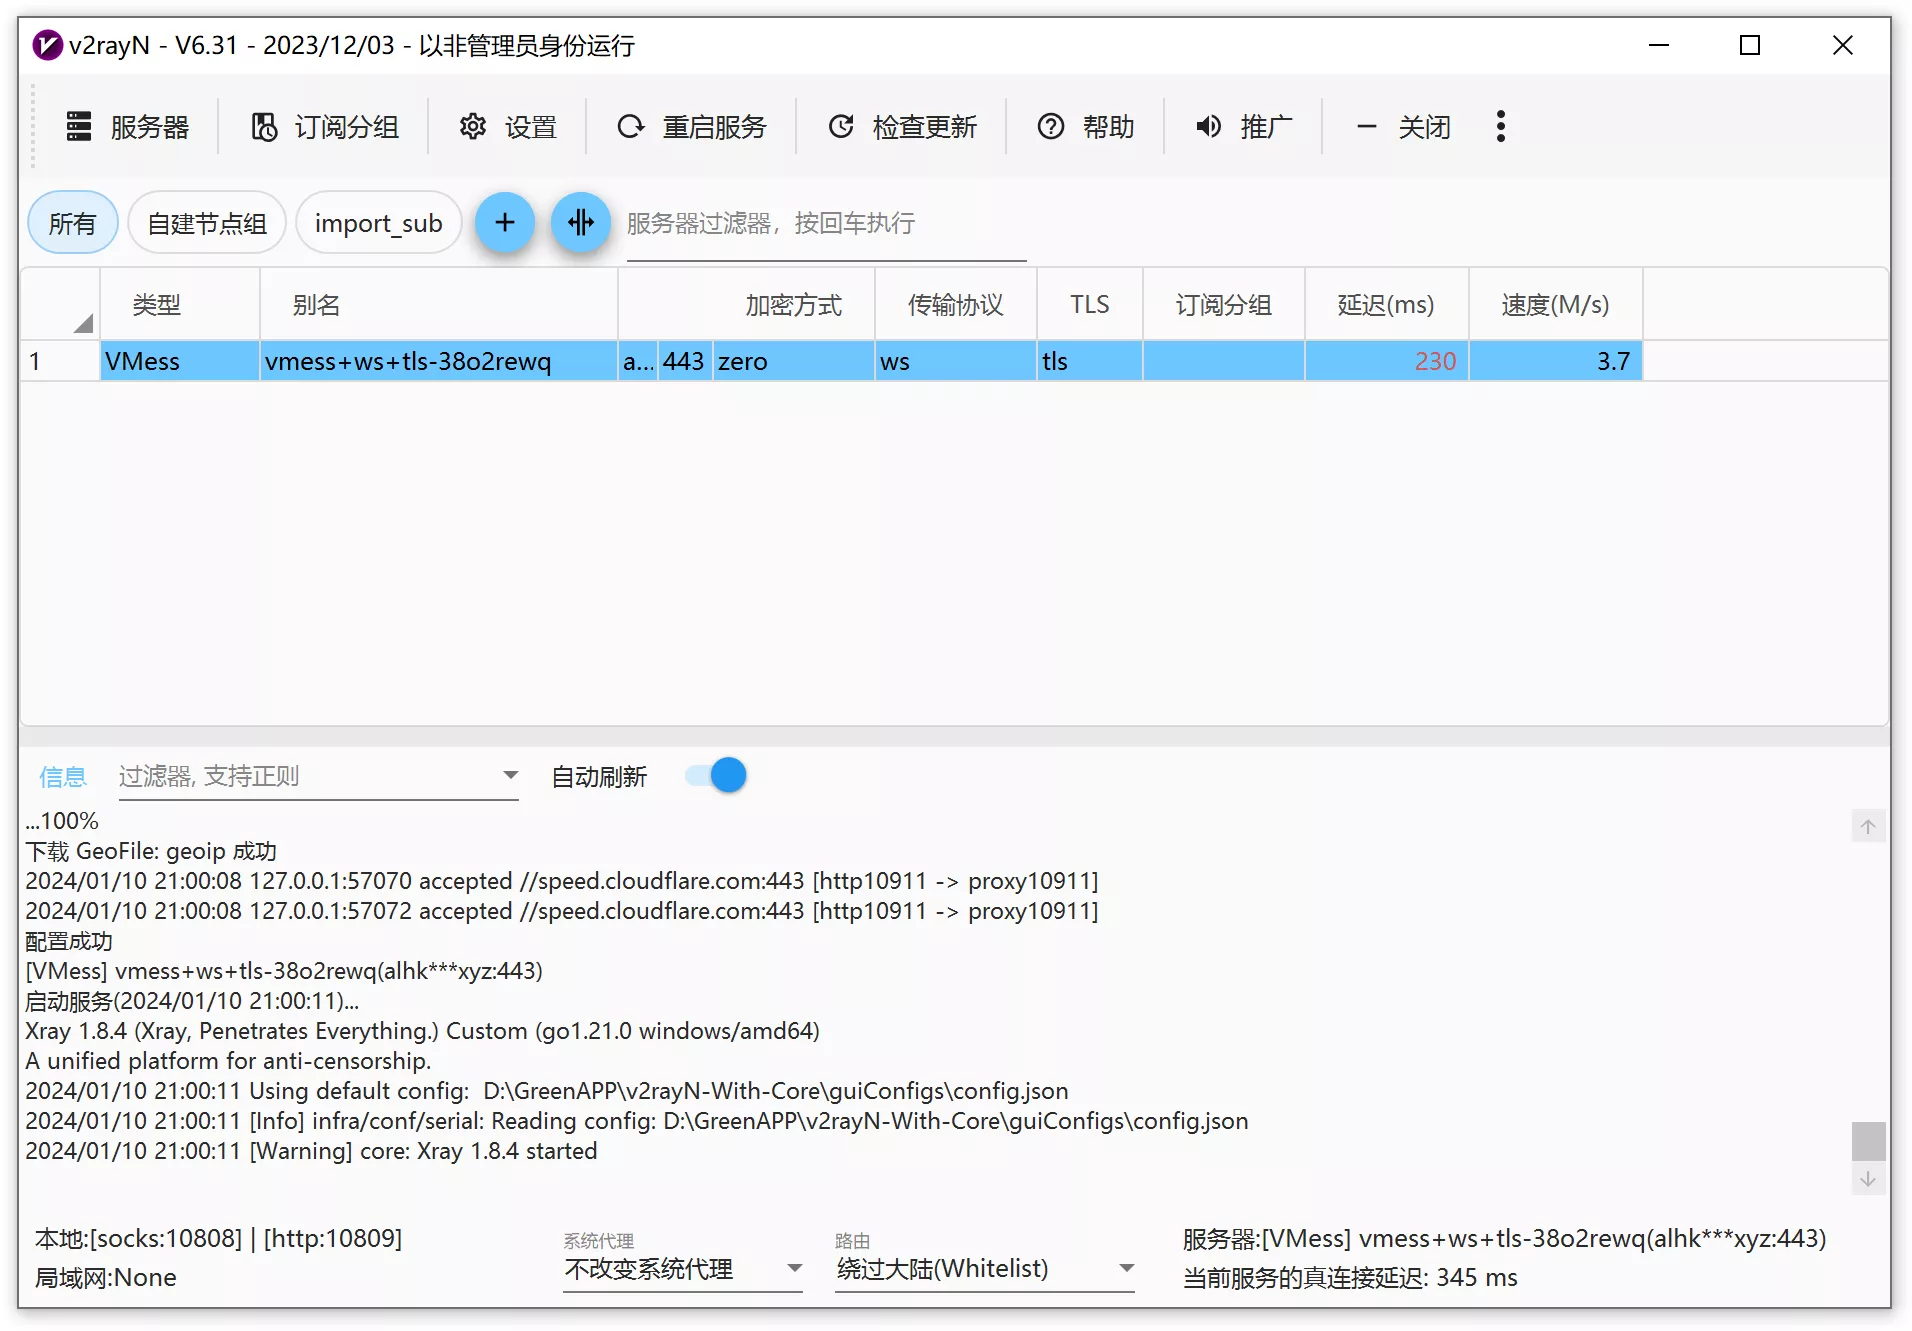
Download the Client: Download the latest version of
v2rayN-With-Core.zip, extract the files, and run the application.Export the Node Link: Open your 3x-ui dashboard and export the share link for the node you just created, as shown in the image below:
In v2rayN, use the shortcut Ctrl + V to import the node link you just copied. However, the node is not yet ready for use; we need to manually modify a few settings.
Right-click the server and select Edit. Update the following fields:
Address: Enter your subdomain (e.g.,
free.your-domain.com).Port: Set this to 443.
Encryption (Security): It is recommended to select zero for better efficiency. (Since the encryption is already handled by TLS at the transport layer, there is no need for secondary encryption).
Transport Layer Security: Select TLS.
Other Settings: Leave everything else at their default values.
After clicking confirm, right-click on the node and select "Test Node Latency and Speed." If all the above steps are performed correctly, the node should be able to successfully test its latency and speed.
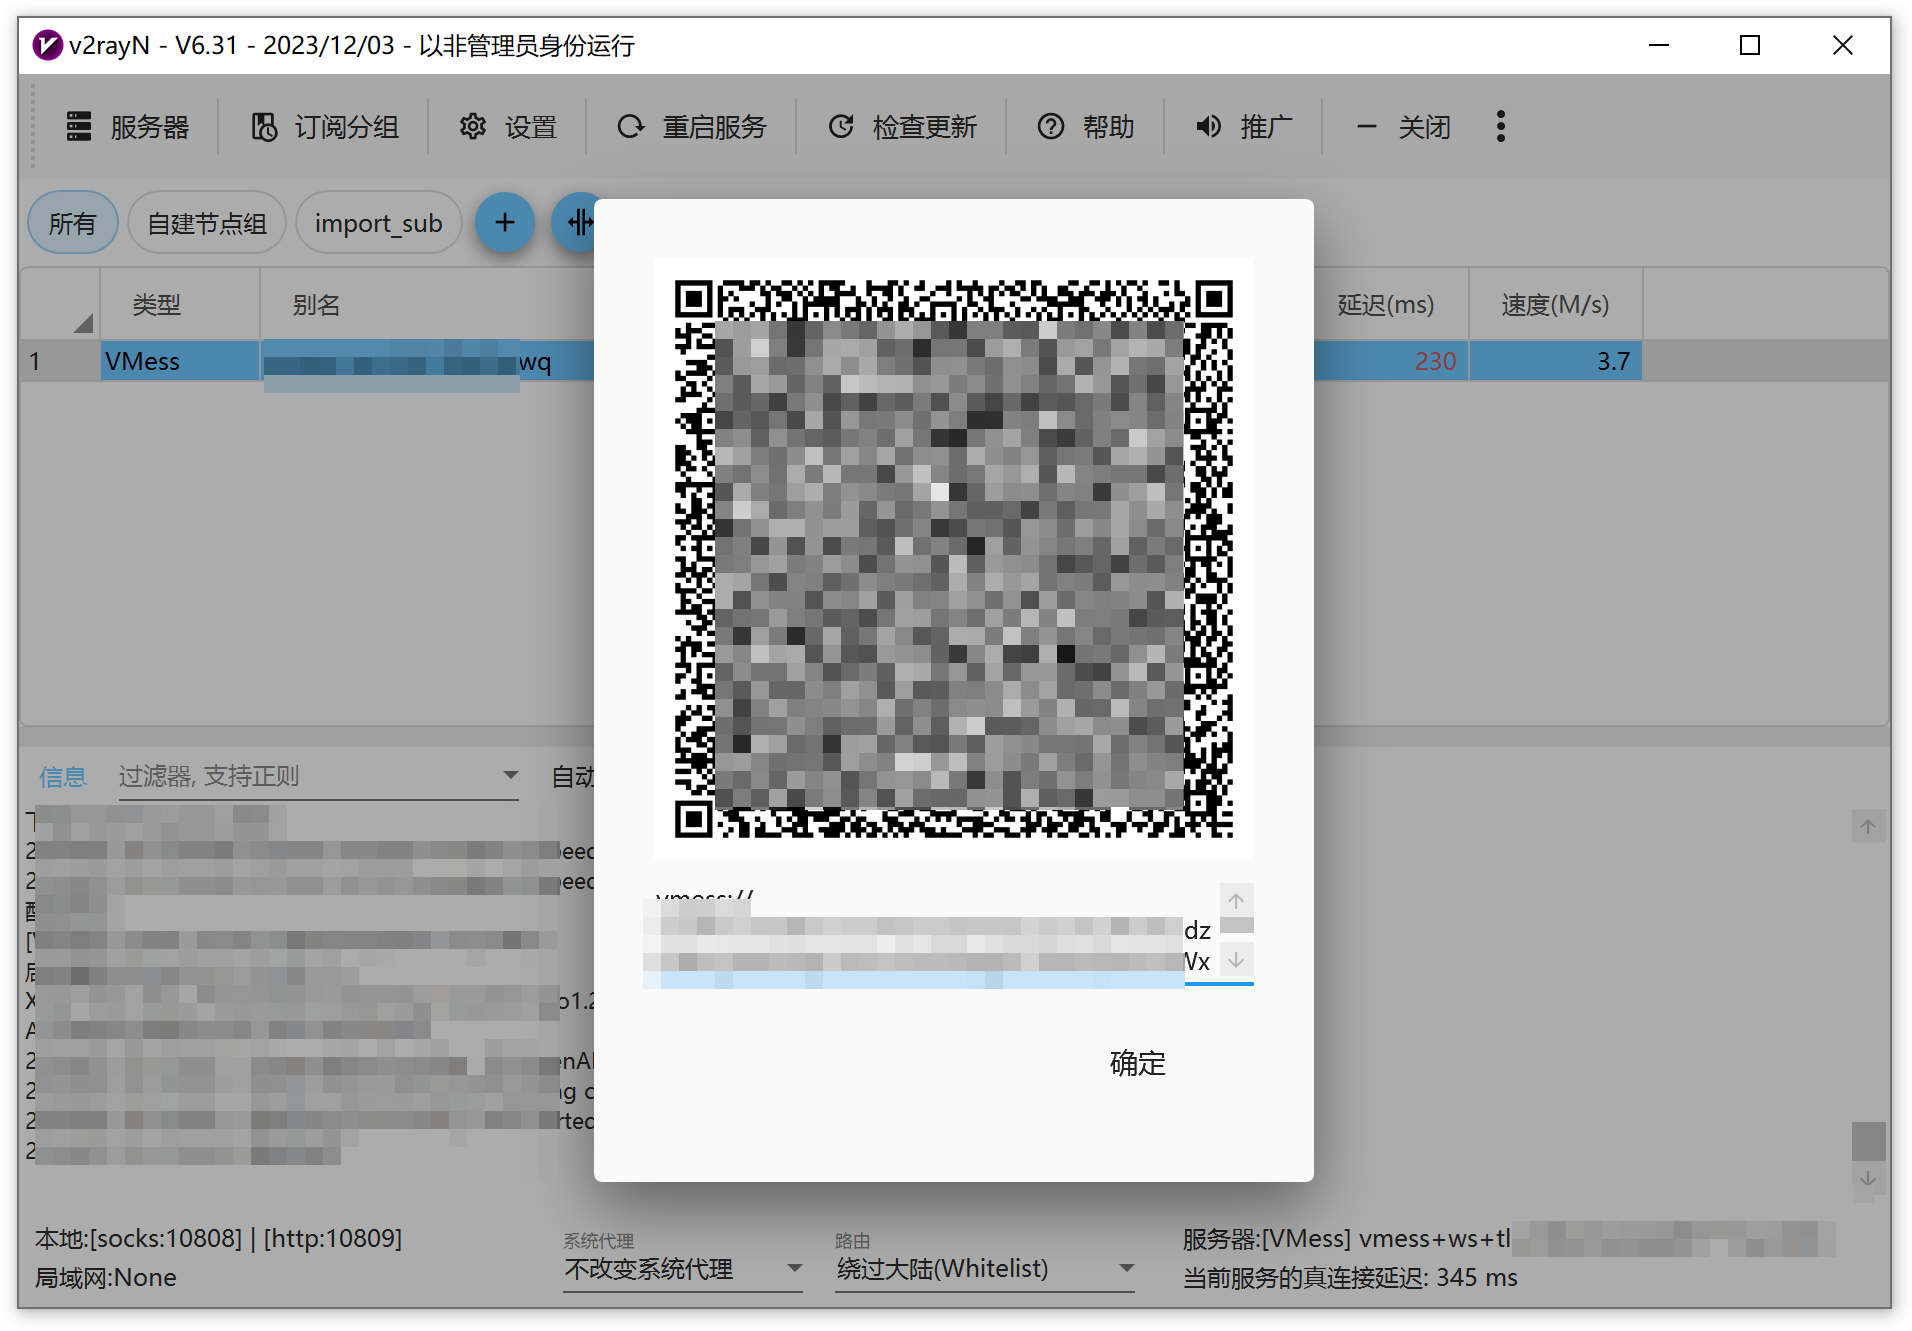
Right-click on the node and select "Share Server." This will generate a QR code and a link for the node, making it easy for other devices to use.
Supplementary Notes
Security Hardening: Once the setup is complete, it is highly recommended to close the 3x-ui panel port (port 10000) via your firewall to prevent brute-force attacks. You should only keep ports 80, 443, and your SSH login port open.
Subscription Conversion: You can use subscription conversion tools to generate sub-links compatible with various clients, including Clash and Shadowrocket.
Low-Memory Optimization: If your machine has limited RAM (e.g., less than 512MB), I do not recommend installing 1Panel, as it consumes roughly 200–300MB. In such cases, manually install Nginx and x-ui only, and use acme.sh to manage your certificates.
Why is this more stable than Trojan? While both use camouflage sites, this method is more resilient because we use Nginx as the web server rather than Trojan's built-in server. As the world's most widely used web server, Nginx makes your node traffic appear as a normal resource-heavy website, significantly reducing its fingerprint against deep packet inspection (DPI).
Update: How to Enable CDN for Your Node
CDN stands for Content Delivery Network. Essentially, it acts as a relay between your local network and your server. While static resources are cached on these relay servers to reduce the load on the origin server, dynamic resources benefit from optimized routing. We use a CDN primarily for the latter.
Because our underlying setup utilizes the WebSocket (WS) transmission protocol, it is technically possible to use a CDN.
Prerequisites: The CDN provider must support the WebSocket protocol. Popular options include:
Cloudflare: Completely free, though the basic routing performance varies.
Amazon CloudFront: Paid service, but typically offers a generous free tier (e.g., 1TB per month).
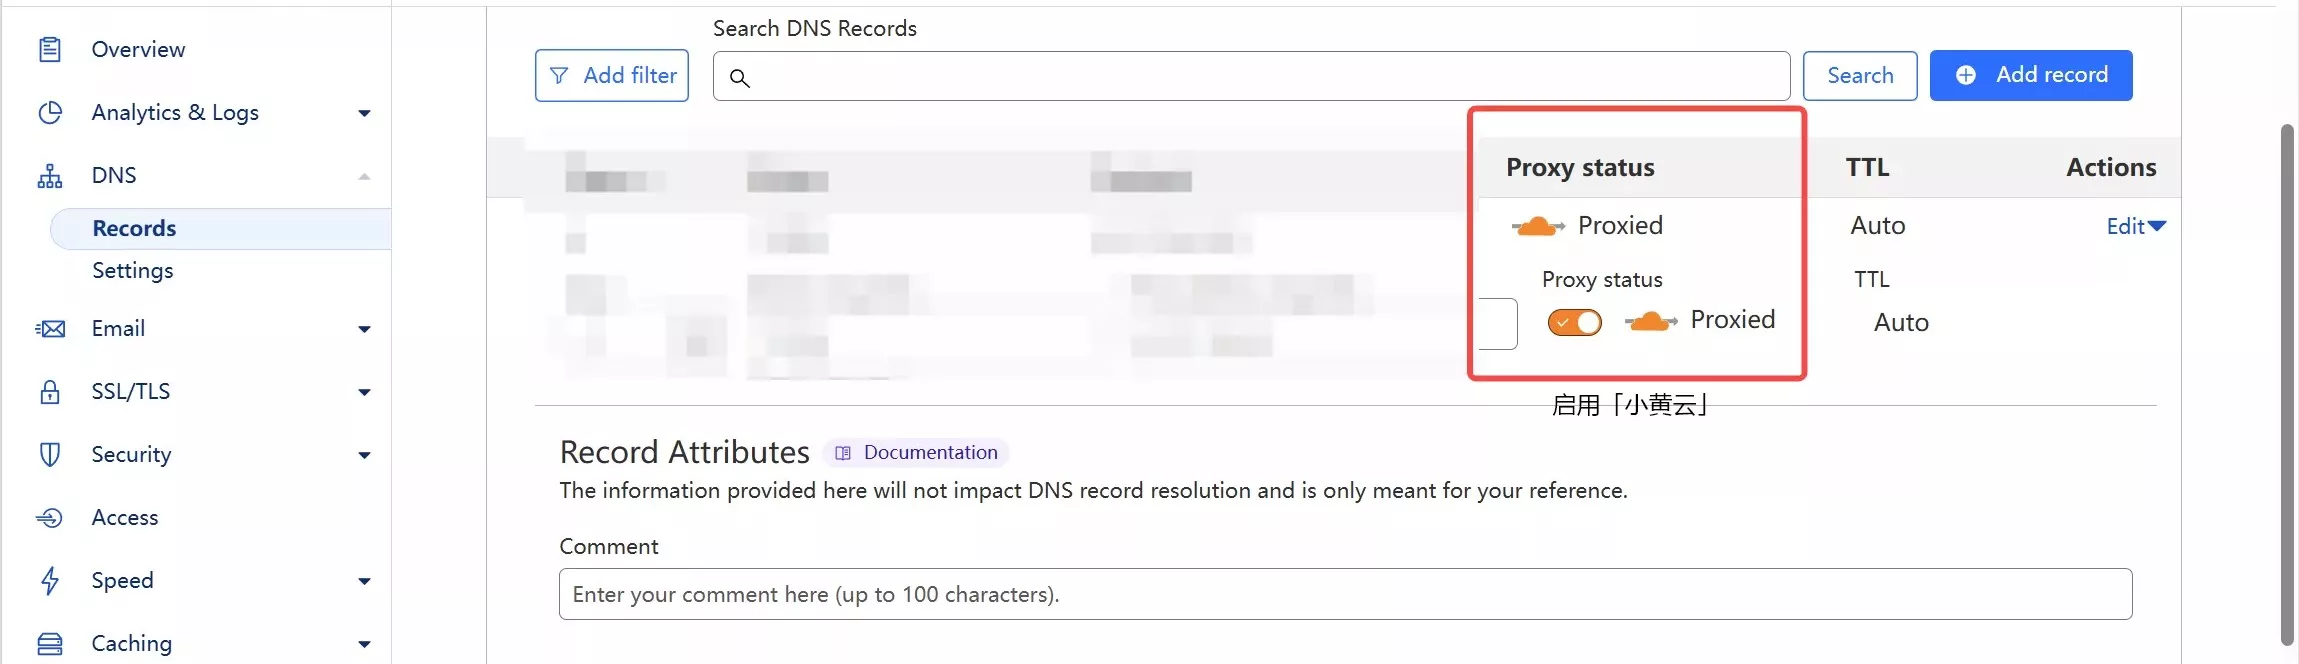
Enabling Cloudflare CDN
Enabling a CDN with Cloudflare is both simple and elegant. Simply go to your DNS settings page and toggle the "Orange Cloud" (Proxied) icon for your DNS record to "On."
However, I had previously tried using a CDN in this way, but encountered problems with node connectivity, and my browser kept showing a "too many redirects" error when accessing the disguised domain I had set up. Today, with the help of suggestions in the comments section, I finally found the reason, as shown in the image below:
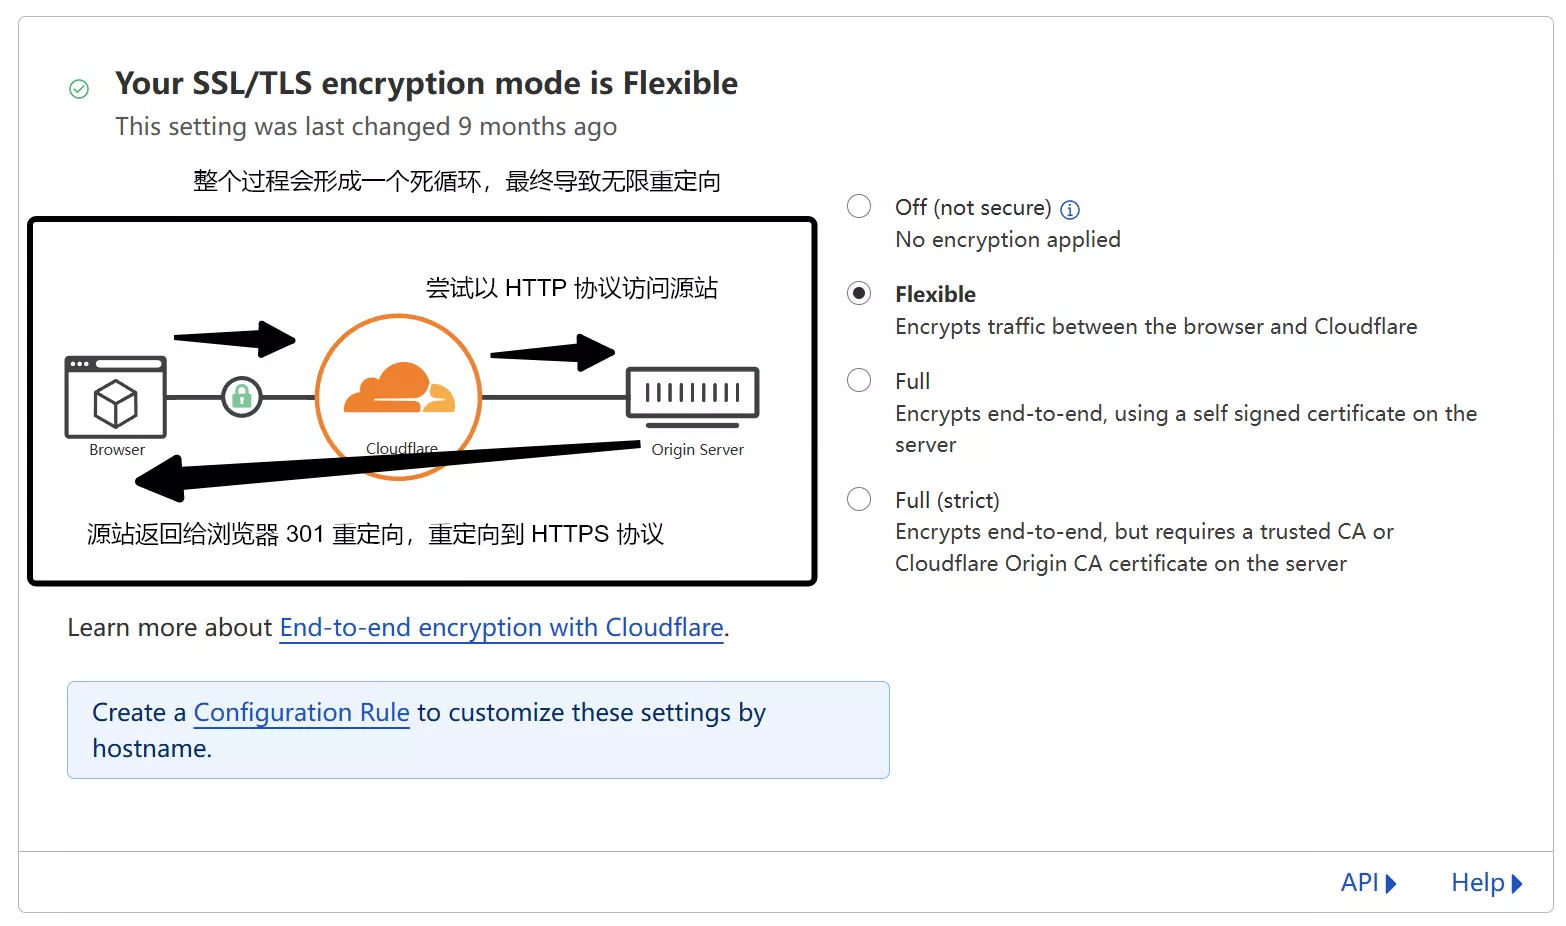
Solution for Connection Issues:
If you encounter issues after enabling the CDN (such as redirection loops or connection timeouts), try the following:
1Panel Settings: Change the HTTP option in 1Panel from "Redirect HTTP to HTTPS" to "Disable HTTP."
Cloudflare Settings: Alternatively, upgrade the SSL/TLS Encryption Mode in your Cloudflare dashboard to Full or Full (Strict).
Note on Performance: Due to the unique network environment in Mainland China, Cloudflare’s free tier often routes traffic through international nodes rather than direct peering. Consequently, enabling the CDN might lead to increased latency. I have conducted speed tests on two of my servers to compare performance before and after applying the Cloudflare CDN, as shown below:
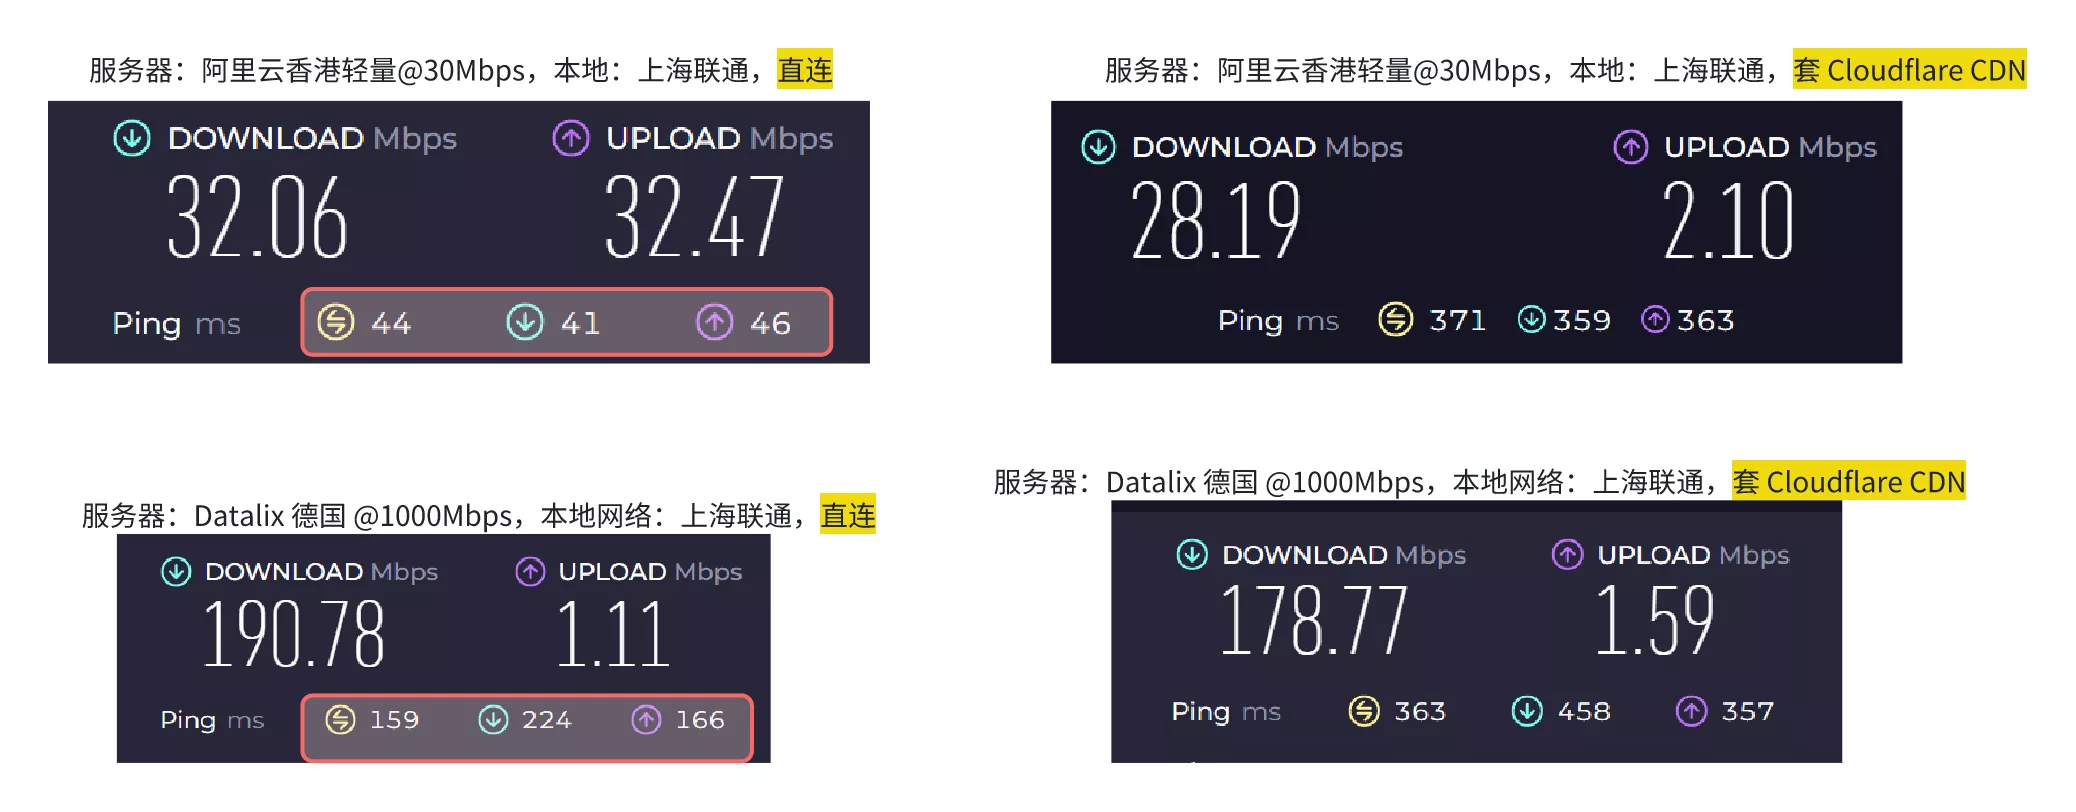
As you can see, after applying the CDN, the speed didn't improve significantly, or even decreased, while the latency increased considerably. Of course, Cloudflare's CDN isn't entirely useless; it can be used to bypass IP blocking if your server's IP address is blocked. Since everyone's network environment is different, you can compare the speed before and after using the CDN to see if there's any improvement. Additionally, there are some tutorials online about "Cloudflare optimized IPs," but I'm too lazy to bother with that, so I won't go into detail here.